The Ultimate Guide to Measuring Tools: Precision Instruments for Every Workshop
In machining, woodworking, manufacturing, or even DIY projects—accurate measurements are the difference between a perfect fit and a failed part. A 0.01mm error in a bearing housing can cause friction and premature wear; a mismeasured wood cut can ruin an entire furniture piece. That’s why choosing the right measuring tool (and using it correctly) is non-negotiable.
This guide breaks down the most essential measuring tools every professional and hobbyist needs, including digital calipers, dial indicators, micrometers, feeler gauges, and straight edges. We’ll cover how each tool works, what it’s best for, common mistakes to avoid, and how to keep them calibrated for reliable results. By the end, you’ll build a 量具 (measuring tool) kit that ensures precision in every project.
1. Digital Calipers: The All-in-One Measurement Workhorse
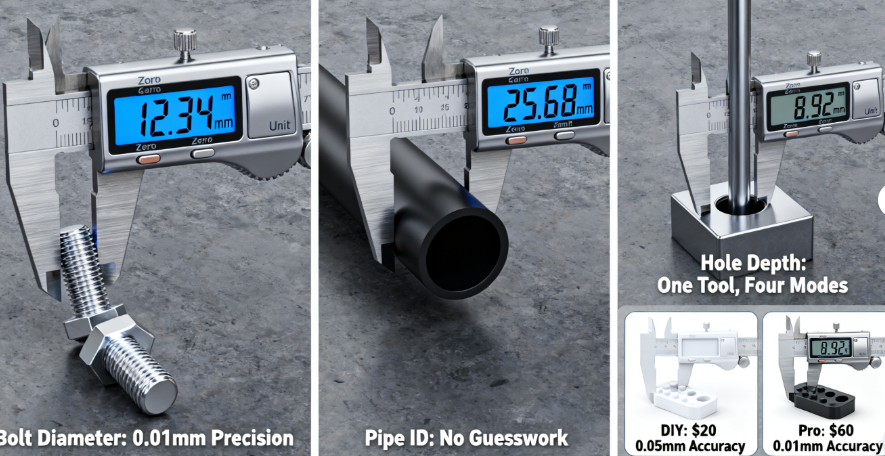
Digital calipers are the most versatile measuring tools in any workshop—they measure external dimensions (e.g., bolt diameter), internal dimensions (e.g., pipe ID), depth (e.g., hole depth), and steps (e.g., raised edges on a part) with just one tool. Unlike traditional vernier calipers (which require squinting at tiny scales), digital calipers display readings instantly on an LCD screen, eliminating human error.
Key Types & Features
- Stainless Steel Calipers: For professionals—durable, corrosion-resistant, and precise (0.01mm accuracy). Ideal for metalworking, where precision and durability matter.
- Plastic Calipers: For hobbyists and DIY projects—affordable (under $30), lightweight, and won’t scratch soft materials like wood or plastic. Accuracy is lower (0.05mm) but sufficient for non-critical tasks.
- Carbon Fiber Calipers: For fieldwork—lightweight (half the weight of stainless steel) and water/dust-resistant (IP54 rating). Perfect for on-site measurements in construction or automotive repair.
Pro Tips for Accuracy
- Clean the Jaws First: A tiny speck of dust or metal shavings can add 0.05mm to your reading—wipe jaws with a lint-free cloth before use.
- Zero Before Measuring: Close the jaws gently and press the “Zero” button. If the screen doesn’t read “0.00mm,” the caliper may need calibration.
- Avoid Measuring Hot Parts: Metal expands when heated—wait for the workpiece to cool to room temperature (20–25°C) to get an accurate reading.
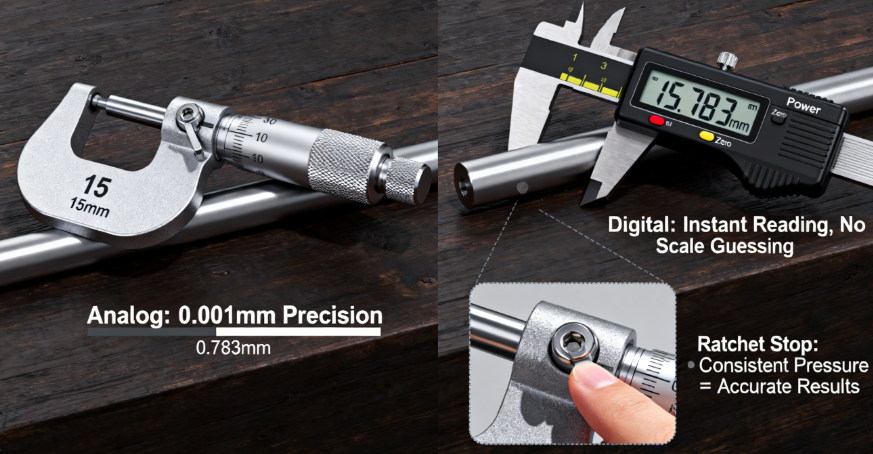
2. Micrometers: The Gold Standard for Ultra-Precise Measurements
When you need measurements more precise than a caliper (down to 0.001mm), a micrometer is the tool to use. Micrometers are designed for measuring small, cylindrical parts (e.g., bearings, shafts) or thin materials (e.g., metal sheets)—they use a precision screw mechanism to achieve unmatched accuracy.
Key Types & Uses
- Outside Micrometers: Measure external dimensions (e.g., shaft diameter). The most common type—available in ranges like 0–25mm, 25–50mm, and 50–75mm (you’ll need multiple sizes for different part sizes).
- Inside Micrometers: Measure internal dimensions (e.g., bearing housing ID). They have extendable rods to reach into holes and a dial or digital display for readings.
- Depth Micrometers: Measure depth (e.g., the depth of a recess in a metal block). Similar to outside micrometers but with a depth rod instead of jaws.
How to Use an Outside Micrometer
- Clean the Anvils: Wipe the fixed and moving anvils (the two flat surfaces that touch the workpiece) with a cloth.
- Position the Part: Place the workpiece between the anvils—hold the micrometer by the frame (not the thimble, which transfers heat to the tool).
- Adjust the Thimble: Turn the thimble until the anvils touch the part gently. Use the ratchet stop (a small lever) to apply consistent pressure—over-tightening bends the frame and distorts readings.
- Read the Scale: For analog micrometers: Read the main scale (mm) first, then the thimble scale (0.01mm increments). For digital micrometers: The screen displays the reading instantly (e.g., “15.783mm”).
3. Dial Indicators: Detect Tiny Movements & Misalignments
Dial indicators (also called dial gauges) are designed to measure tiny movements (as small as 0.001mm) and check for misalignments—critical for tasks like aligning lathe chucks, verifying surface flatness, or checking bearing runout. They’re useless without a stable stand, which holds the indicator in place and prevents hand tremors from ruining readings.
Key Types & Stand Pairings
- Lever Dial Indicators: Have a hinged, angled stylus that moves side-to-side. Perfect for checking runout (e.g., a warped brake rotor) or reaching tight spots (e.g., between gears). Pair with a magnetic stand (attaches to ferrous surfaces like lathe beds) for portability.
- Plunger Dial Indicators: Have a straight, vertical stylus that moves up and down. Ideal for measuring surface flatness (e.g., a mill table) or part thickness. Pair with a benchtop stand (heavy steel base) for stability.
- Digital Dial Indicators: Replace the analog needle with an LCD screen—no more squinting at tiny dial marks. Many have Bluetooth to log readings (useful for quality control reports).
Common Use Case: Checking Lathe Chuck Runout
- Mount the Stand: Attach a magnetic stand to the lathe bed, 1–2 inches from the chuck.
- Position the Stylus: Adjust the stand’s arm so the lever stylus touches the chuck’s outer edge—apply light pressure (the needle should deflect 1–2 divisions).
- Zero the Dial: Rotate the dial face until the needle points to “0.”
- Spin the Chuck: Turn the chuck slowly (one full rotation). Note the maximum needle movement—runout >0.01mm means the chuck needs adjustment (loosen the jaws and realign the part).

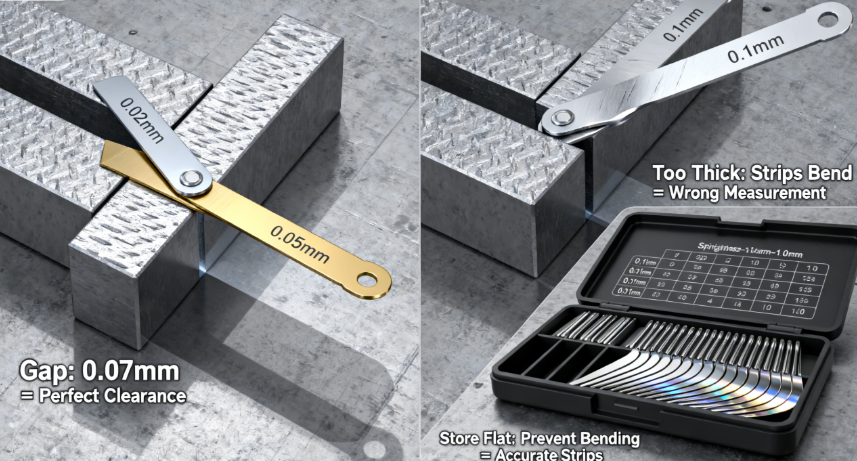
4. Feeler Gauges: Measure Small Gaps & Clearances
Feeler gauges (also called thickness gauges) are sets of thin, flexible metal strips with precise thicknesses (e.g., 0.02mm, 0.05mm, 0.1mm). They’re used to measure small gaps and clearances—like the gap between a spark plug electrode, the clearance between a camshaft and lifter, or the space between two mating parts.
How to Use a Feeler Gauge
- Choose the Right Strips: Select one or more strips whose total thickness matches the gap you’re measuring. For example, to measure a 0.07mm gap: Use a 0.02mm strip + a 0.05mm strip.
- Insert Gently: Slide the strips into the gap—they should fit snugly but not forcefully. If the strips are too thick, they won’t fit; if too thin, they’ll slide freely.
- Avoid Overlapping Too Many Strips: Using more than 3–4 strips at once reduces accuracy (the strips bend and create gaps between them).
Pro Tip for Longevity
Keep feeler gauges clean and dry—moisture causes rust, which thickens the strips and ruins accuracy. After use, wipe each strip with a dry cloth and store them in the original case (which keeps them flat and prevents bending).
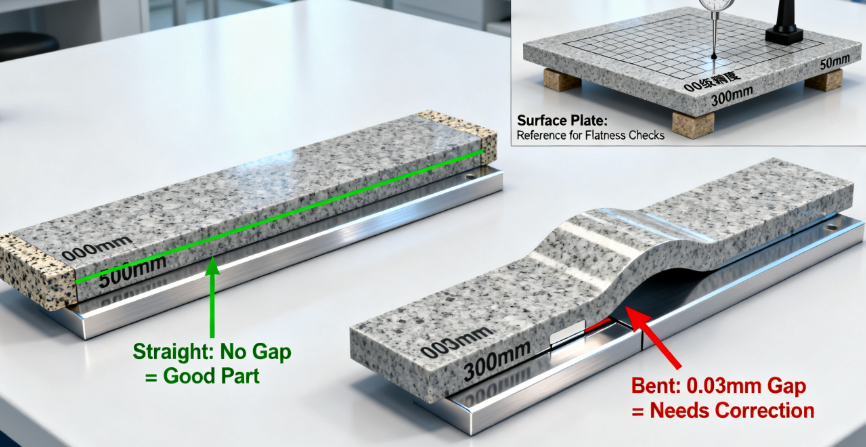
5. Straight Edges & Surface Plates: Check Flatness & Straightness
Straight edges and surface plates are the “reference tools” that ensure other measurements are accurate—they provide a perfectly flat or straight surface to compare workpieces against.
Straight Edges
- Purpose: Check if a surface is straight (e.g., a metal bar or a wood board). Available in lengths from 150mm to 1m—choose a length slightly longer than the workpiece.
- Types:
- Steel Straight Edges: Durable, corrosion-resistant, and precise (flatness within 0.01mm per meter). Ideal for metalworking.
- Granite Straight Edges: Even more precise than steel (flatness within 0.005mm per meter) and non-magnetic (won’t attract metal chips). Used for high-precision tasks like optical part manufacturing.
Surface Plates
- Purpose: Provide a perfectly flat surface for measuring parts (e.g., using a dial indicator to check a part’s flatness) or assembling components.
- Types:
- Cast Iron Surface Plates: Affordable, durable, and shock-resistant. Ideal for general workshop use.
- Granite Surface Plates: Non-porous (won’t absorb oil or coolant), non-magnetic, and more precise than cast iron. Used in quality control labs and high-precision machining.
How to Use a Straight Edge
- Clean Both Surfaces: Wipe the straight edge and the workpiece with a cloth to remove debris.
- Place the Straight Edge: Lay the straight edge across the workpiece.
- Check for Gaps: Use a feeler gauge to measure any gaps between the straight edge and the workpiece. A flat surface has no gaps (or gaps <0.01mm).
How to Calibrate Measuring Tools (Keep Them Accurate)
Even the best measuring tools drift over time—dust, wear, and temperature changes all affect accuracy. Calibrate your tools every 6–12 months (or more often if you use them daily) using these methods:
- Digital Calipers/Micrometers: Use a precision gauge block set (certified to ±0.001mm). Measure the gauge block with your tool—if the reading differs by >0.01mm, adjust the tool (most digital models have a calibration button) or send it to a professional lab.
- Dial Indicators: Use a master flat (a perfectly flat metal plate) or a gauge block. Zero the indicator on the master, then move it across the surface—any deviation means the indicator needs adjustment.
- Feeler Gauges: Use a micrometer to measure each strip—if the thickness differs by >0.005mm, replace the set (feeler gauges are cheap and hard to sharpen).
Final Thoughts
The right measuring tools turn guesswork into certainty. A beginner doesn’t need a $500 granite surface plate for woodworking, but they do need a reliable digital caliper. A professional machinist can’t rely on a plastic caliper for bearing measurements—they need a stainless steel micrometer and dial indicator.
By understanding each tool’s purpose, mastering its use, and keeping it calibrated, you’ll save time, reduce waste, and create parts that fit perfectly every time. Remember: Precision isn’t just about the tool—it’s about the technique. Even a $1,000 micrometer gives bad readings if used incorrectly.
Now grab your caliper, zero it out, and start measuring—your next perfect project is waiting!