Taps and Dies: Your Complete Guide to Thread – Cutting Hardware Tools
In the intricate world of hardware and metalworking, two tools stand as the cornerstone of creating secure and functional threaded connections: taps and dies. Taps are the precision instruments that carve internal threads into holes, while dies perform the complementary task of cutting external threads on rods or pipes. Whether you’re a seasoned mechanic, a DIY enthusiast, or a professional machinist, understanding these tools – their types, how they work, and how to use them effectively – is crucial for achieving high – quality, long – lasting results.
Introduction to Taps and Dies
Taps: The Internal Thread – Cutters
As we’ve previously explored in detail, a tap is a cylindrical tool equipped with spiral – shaped cutting edges known as flutes. Its hardened steel body is designed to be rotated into a pre – drilled hole. The flutes slice through the material, creating grooves that match the specific pitch and size of the desired internal thread, such as M8x1.25 metric threads or ¼”-20 UNC imperial threads.
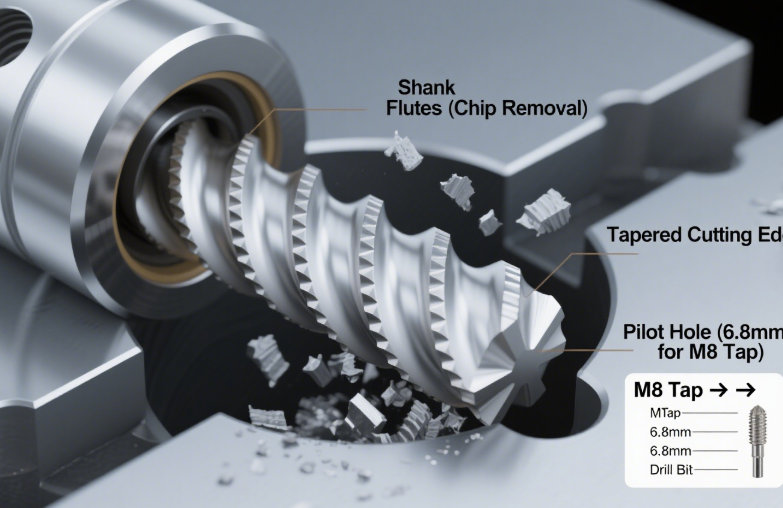
Anatomy of a Tap
- Shank: The smooth, non – cutting upper part of the tap. It serves as the connection point to a tap wrench or a drill chuck, enabling controlled rotation.
- Flutes: These spiral channels play a vital role in removing metal chips (swarf) during the cutting process. By preventing chip clogging, they help to avoid overheating and ensure smooth thread cutting.
- Cutting Edge: The sharp, angled tip of the flute is responsible for carving the thread. Most taps feature a “tapered start” (usually 3 – 5 thread turns) to gently guide the tool into the hole.
Thread – Cutting Process with Taps
- Pre – Drill the Hole: Begin by drilling a “pilot hole” with a diameter slightly smaller than the tap’s major diameter. Consult a “tap drill size chart” to select the appropriate drill bit. For example, an M8 tap typically requires a 6.8mm drill bit.
- Secure the Tap: Attach the tap to a tap wrench for manual operation or a cordless drill for powered use. This provides the necessary rotational force.
- Cut the Thread: Rotate the tap clockwise (for right – hand threads) into the pilot hole. For every 1 – 2 turns, reverse the tap slightly. This breaks off and clears chips from the flutes, preventing them from binding.
- Finish the Thread: Continue the process until the tap reaches the desired depth. Then, carefully back it out to avoid damaging the newly cut threads.
Dies: The External Thread – Creators
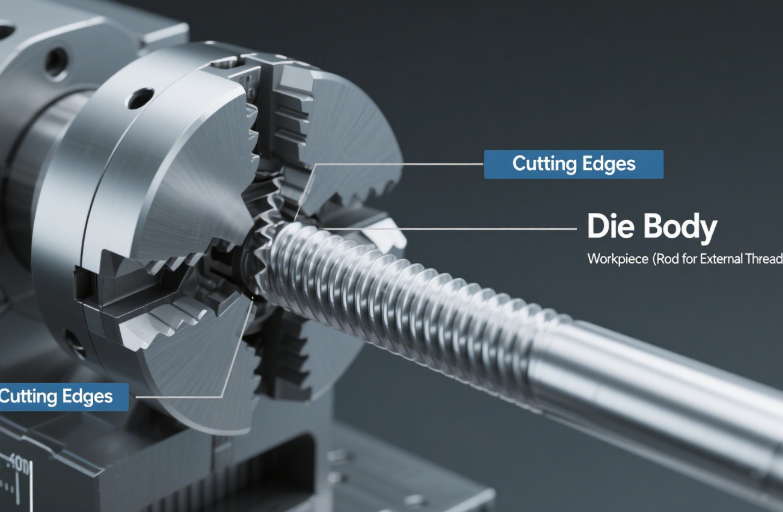
A die is a tool used to cut external threads on cylindrical workpieces, such as rods or pipes. It is essentially a circular or hexagonal – shaped plate with a threaded hole in the center. The inner surface of the die has cutting edges that, when the die is rotated around the workpiece, cut the material to form the desired external thread.
Anatomy of a Die
- Cutting Edges: These are the sharp, angled surfaces on the inner diameter of the die. They are responsible for removing material from the workpiece to create the thread.
- Body: The main structure of the die, which can be either solid or adjustable. Solid dies have a fixed thread size, while adjustable dies can be adjusted to cut different thread sizes within a certain range.
- Alignment Features: Some dies come with features like chamfers or guides at the entrance to help align the die accurately on the workpiece and start the thread – cutting process smoothly.
Thread – Cutting Process with Dies
- Prepare the Workpiece: Ensure the workpiece is the correct diameter for the die. The diameter of the rod or pipe should be slightly smaller than the nominal diameter of the thread to be cut. For example, for a ¼”-20 UNC external thread, the rod diameter should be around 0.213 inches.
- Secure the Die: Place the die in a die stock, which is a tool that holds the die and provides a means for applying torque. Some dies, especially small ones, can also be used by hand without a die stock.
- Cut the Thread: Start the die at one end of the workpiece. Apply pressure and rotate the die stock (or the die if using by hand) clockwise (for right – hand threads) around the workpiece. As with taps, it is often beneficial to reverse the rotation slightly every few turns to break up and clear chips.
- Finish the Thread: Continue the process until the desired length of the thread is cut. Then, carefully remove the die from the workpiece.
Types of Taps and Dies
Types of Taps
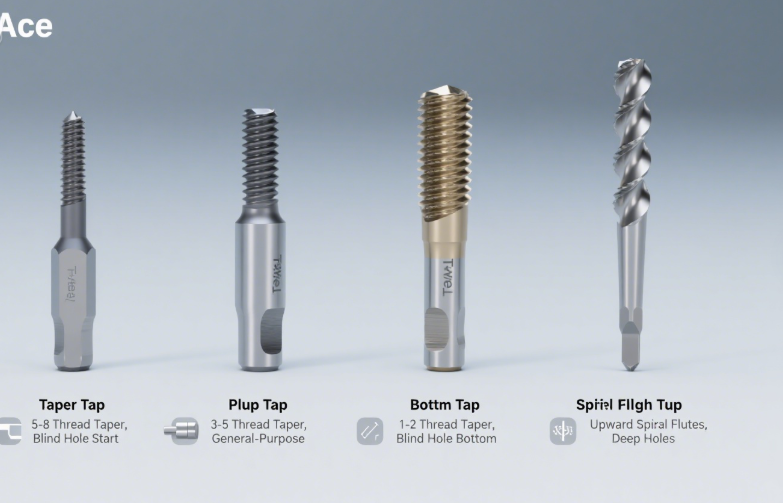
- Taper Taps (Starting Taps)
- Design: Characterized by a long, gradual taper at the tip, typically spanning 5 – 8 thread turns.
- Best For: Ideal for initiating threads in blind holes (holes that do not penetrate through the entire material) or in soft materials like aluminum and plastic.
- Limitations: Cannot cut full threads all the way to the bottom of a blind hole due to the taper.
- Plug Taps (General – Purpose Taps)
- Design: Feature a shorter taper (3 – 5 thread turns) compared to taper taps, along with more full – thread cutting edges.
- Best For: The most commonly used tap type. It works well for both blind and through holes (holes that go all the way through the material) and can be used with a wide range of materials, including steel, brass, and wood.
- Popularity Reason: It strikes a balance between ease of starting and the ability to cut full – depth threads in blind holes.
- Bottoming Taps (Finishing Taps)
- Design: Have almost no taper (1 – 2 thread turns), with the cutting edge starting close to the tip.
- Best For: Perfect for cutting full threads to the very bottom of blind holes, such as when threading a hole for a set screw that needs to sit flush.
- Pro Tip: Always start with a taper or plug tap first, then switch to a bottoming tap to finish. Never attempt to start a hole with a bottoming tap, as it will likely bind and break.
- Spiral Flute Taps (Chip – Clearing Taps)
- Design: The flutes on these taps twist upward in a corkscrew – like fashion.
- Best For: Well – suited for through holes and deep blind holes (holes with a depth 3 times the diameter or more), especially when working with tough metals like stainless steel that produce long, stringy chips.
- Advantage: They are highly effective at reducing chip clogging and overheating, which extends the tap’s lifespan and improves thread quality.
Types of Dies
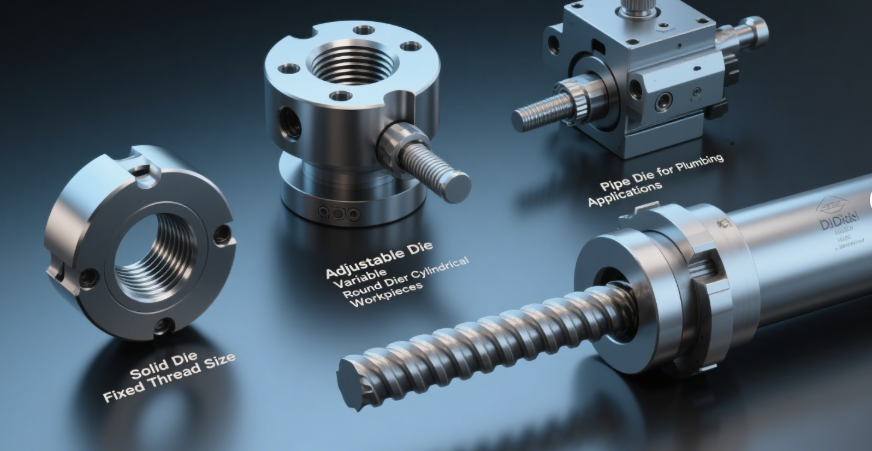
- Solid Dies
- Design: These are one – piece dies with a fixed thread size. They are simple in design and are often used for high – volume production of a single thread size.
- Best For: Applications where a specific, standard thread size needs to be cut repeatedly, such as in manufacturing bolts or screws of a particular size.
- Limitations: Lack flexibility; they can only cut one specific thread size.
- Adjustable Dies
- Design: These dies have a mechanism that allows for adjustment of the thread – cutting diameter. They typically consist of two or more parts that can be moved closer together or further apart to change the size of the thread they cut.
- Best For: Handy for situations where multiple thread sizes need to be cut with a single die, or when the exact thread size may vary slightly. For example, in a repair shop where different sizes of threaded rods may need to be serviced.
- Advantage: Offer greater versatility compared to solid dies, reducing the need to carry a large number of different – sized dies.
- Round Dies
- Design: As the name implies, they are circular in shape. They are commonly used for cutting external threads on round rods.
- Best For: General – purpose external thread cutting on cylindrical workpieces. They are easy to use and can be found in a wide range of sizes.
- Pipe Dies
- Design: Specifically designed to cut threads on pipes. They often have a larger diameter and are made to withstand the tougher materials and larger – scale cutting required for pipe threading.
- Best For: Plumbing and pipe – fitting applications, where threads need to be cut on pipes for connections.
Material Selection for Taps and Dies
Tap Materials
- High – Speed Steel (HSS)
- Hardness (HRC): 60 – 65
- Best For Cutting Materials: Aluminum, brass, mild steel, and wood.
- Key Advantages: It is an affordable option and is relatively easy to sharpen when it becomes dull.
- Price Range: Usually in the range of 5−20.
- HSS – Co (HSS + Cobalt)
- Hardness (HRC): 65 – 67
- Best For Cutting Materials: Stainless steel and alloy steel.
- Key Advantages: It offers excellent heat – resistance and has a lifespan that is approximately 2 times longer than standard HSS taps.
- Price Range: Typically costs between 10−35.
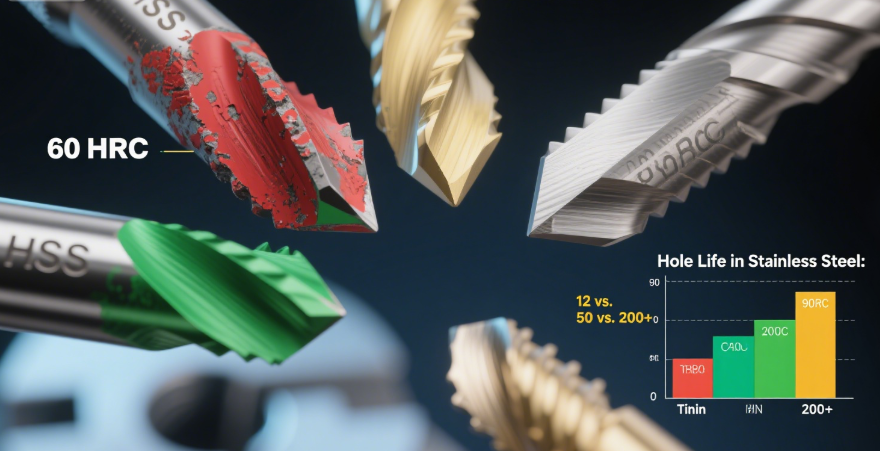
- Carbide – Tipped
- Hardness (HRC): 85 – 90
- Best For Cutting Materials: Hardened steel (with a hardness of HRC 45 +) and cast iron.
- Key Advantages: Extremely hard and durable, and does not require sharpening. However, it is more brittle than HSS – based taps.
- Price Range: Falls in the range of 25−80.
- Titanium – Nitride (TiN) Coated HSS
- Hardness (HRC): 65 – 67
- Best For Cutting Materials: All metals. The TiN coating reduces friction during cutting.
- Key Advantages: Has a lifespan that is about 3 times longer than uncoated HSS taps, due to the reduced friction and enhanced wear resistance.
- Price Range: Usually priced between 8−30.
Real – World Test: When cutting 50 M8 threads in 304 stainless steel:
- An uncoated HSS tap dulled after 12 holes and required sharpening.
- An HSS – Co tap was able to finish all 50 holes with only minor wear.
- A carbide – tipped tap handled over 200 holes before needing replacement.
Die Materials
- Tool Steel
- Hardness (HRC): 55 – 62
- Best For Cutting Materials: Similar to HSS taps, it can be used for cutting threads on a variety of materials including mild steel, aluminum, and brass.
- Key Advantages: It is a cost – effective option for general – purpose die applications. It has good wear resistance and can withstand the forces involved in thread cutting.
- Price Range: Dies made of tool steel are relatively affordable, with prices starting from around $10 for smaller sizes.
- High – Speed Steel (HSS) for Dies
- Hardness (HRC): 60 – 65
- Best For Cutting Materials: HSS dies are well – suited for cutting threads on tougher materials like alloy steels. They can also handle high – speed cutting operations better than tool – steel dies.
- Key Advantages: Offer better heat resistance compared to tool steel, allowing for faster cutting speeds without excessive wear. They are also more durable for cutting harder materials.
- Price Range: HSS dies are typically a bit more expensive than tool – steel dies, with prices ranging from 15−40 depending on the size and complexity.
- Carbide Dies
- Hardness (HRC): 85 – 90
- Best For Cutting Materials: Ideal for cutting threads on extremely hard materials such as hardened steel and high – strength alloys.
- Key Advantages: Provide exceptional wear resistance and can maintain sharp cutting edges for a long time. They are capable of producing high – quality threads in the most demanding applications.
- Price Range: Carbide dies are the most expensive option, with prices starting from around $50 and going up significantly for larger or more specialized sizes.
Pro Tips for Using Taps and Dies
Tips for Using Taps
- Use the Right Pilot Hole Size
- A pilot hole that is too small will cause the tap to bind and potentially break, while a hole that is too large will result in weak, stripped threads. Always consult a reliable “tap drill size chart.” For example:
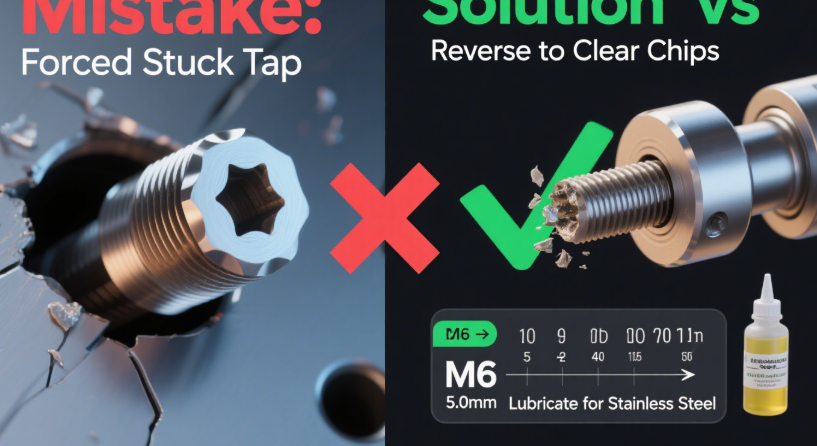
- An M6x1.0 tap requires a 5.0mm pilot hole.
- A ¼”-20 UNC tap needs a #7 drill bit (which is approximately 3.6mm).
- Lubricate Generously
- Lubrication is crucial for tap performance. It reduces friction, cools the tap, and prevents chips from sticking.
- For metals like steel and stainless steel, use an oil – based lubricant such as cutting oil.
- When working with wood or plastic, a wax – based lubricant is preferred as it avoids staining.
- Control Rotation Speed
- If using a manual tap wrench, rotate at a rate of 1 – 2 turns per second. A slow and steady rotation helps to ensure accurate thread cutting.
- When using a powered drill, set it to a low speed, typically in the range of 200 – 500 RPM. Also, use the reverse function to clear chips regularly.
- Stop if You Feel Resistance
- If the tap suddenly encounters resistance and gets stuck, do not force it. Gently reverse the tap to clear any chips that may be causing the blockage. Forcing a stuck tap will likely break it, and removing a broken tap from a hole can be a time – consuming and difficult process, often requiring a specialized “tap extractor tool.”
Tips for Using Dies
- Select the Right Workpiece Diameter
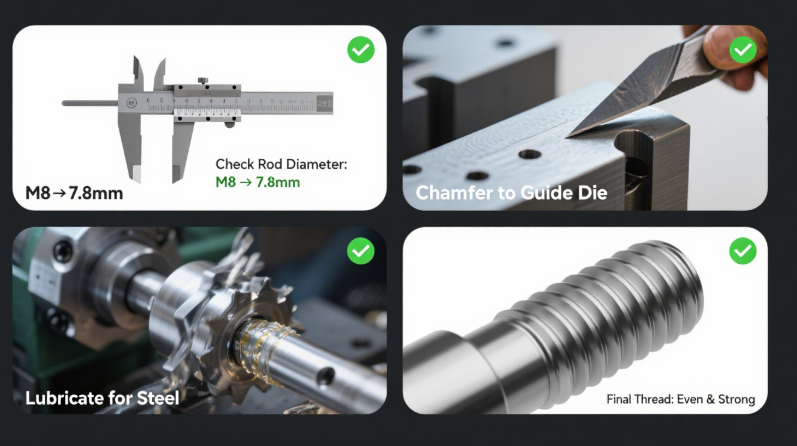
Just as with taps and pilot holes, using the correct diameter of the workpiece is non-negotiable for clean, strong threads. If the rod is too thick, the die will bind and overheat; if too thin, the threads will be weak and prone to stripping. Reference a die workpiece size chart—for example:- ¼”-20 UNC external thread → 0.213” (5.41mm) rod diameter
- M8x1.25 metric thread → 7.8mm rod diameter
A quick trick: Use a caliper to measure the rod before cutting—this avoids guesswork and wasted materials.
- Chamfer the Workpiece End
Before starting, use a file or deburring tool to create a small chamfer (45° angle) on the end of the rod. This chamfer guides the die onto the workpiece smoothly, preventing the die’s cutting edges from chipping or skipping. Without a chamfer, the die may “catch” on the rod’s sharp end, ruining the first few threads. - Use Die Lubricant
Lubrication is just as important for dies as it is for taps. It reduces friction between the die’s cutting edges and the rod, cools the tool, and helps clear chips.- For ferrous metals (steel, iron): Use cutting oil or motor oil (avoid water-based lubricants—they cause rust).
- For non-ferrous metals (aluminum, brass): Use light machine oil or WD-40 (prevents discoloration).
- For plastic/wood: Skip oil—use a dry lubricant like talcum powder to avoid swelling or staining.
- Avoid Over-Tightening
When rotating the die stock, apply steady but gentle pressure. Over-tightening will compress the rod, creating uneven threads or damaging the die’s cutting edges. If you feel resistance, reverse the die ¼ turn to clear chips—never force it.
Maintenance of Taps and Dies: Extend Tool Life by 50%
High-quality taps and dies are investments—with proper care, they can last for years (or even decades) instead of months. Below is a step-by-step maintenance routine, organized by tool type:
Tap Maintenance
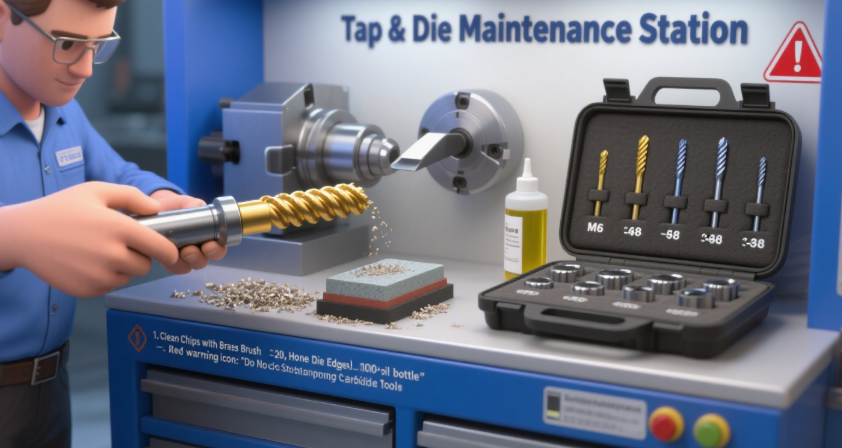
- Clean Immediately After Use
Wipe taps with a lint-free cloth to remove metal chips and lubricant residue. For stuck chips in flutes, use a small brass brush (never steel— it scratches the cutting edges) to gently dislodge debris. For TiN-coated or carbide taps, avoid harsh solvents (e.g., acetone)—they can damage the coating. - Sharpen Dull Taps (HSS Only)
- HSS and HSS-Co taps: Sharpen using a diamond file or a tap sharpening machine. Focus on maintaining the original 60° angle of the cutting edge (use a protractor to check). Sharpen only the “face” of the cutting edge—never the flutes, as this reduces chip-clearing capacity.
- Carbide-tipped taps: Do NOT sharpen—carbide is too hard to file, and improper sharpening will break the tips. Replace carbide taps when they start producing rough threads or binding.
- Store to Prevent Rust & Damage
- Keep taps in a padded tap set case (sorted by size/type) to avoid chipping the cutting edges. Most sets come with labeled slots—use them to avoid mixing sizes.
- For uncoated HSS taps: Apply a light coat of machine oil before storing (prevents rust in humid workshops). For coated taps, skip oil—store in a dry, airtight container.
Die Maintenance
- Clean Chips from Die Holes
After use, use a small pick or compressed air (low pressure) to clear chips from the die’s threaded hole. For adjustable dies, separate the two halves gently and wipe each surface—chips trapped between the halves will cause uneven threads next time. - Sharpen Dies (Tool Steel/HSS)
- Tool steel and HSS dies: Use a die sharpening stone (fine-grit, 1000+ grit) to hone the cutting edges. Rub the stone along the inner hole’s threads in a circular motion, keeping the stone aligned with the thread angle.
- Carbide dies: Replace when dull—sharpening carbide dies requires specialized equipment (e.g., diamond grinding wheels) and is rarely cost-effective for home users.
- Adjust Adjustable Dies Carefully
If your adjustable die starts cutting loose threads, use the set screws on the die’s body to tighten the gap slightly (1/8 turn at a time). Test the die on a scrap rod after each adjustment—over-tightening will make the die too small, causing binding.
Tap & Die Set Buying Guide: What to Look For
For most users, a combination tap & die set is the best value—it includes all the essential sizes for home, automotive, or light industrial use. Here’s how to choose the right set:
1. Choose the Right Thread Standard
- Metric sets: Ideal for modern machinery, electronics, and European/Asian imports. Look for sets with sizes like M3-M12 (covers most small to medium threads).
- Imperial (UNC/UNF) sets: Better for older American tools, cars, and woodworking. A set with ¼”-1” sizes covers most common applications.
- Dual-standard sets: If you work with both metric and imperial parts, opt for a dual set—just ensure the case is clearly labeled to avoid confusion.
2. Prioritize Tool Material
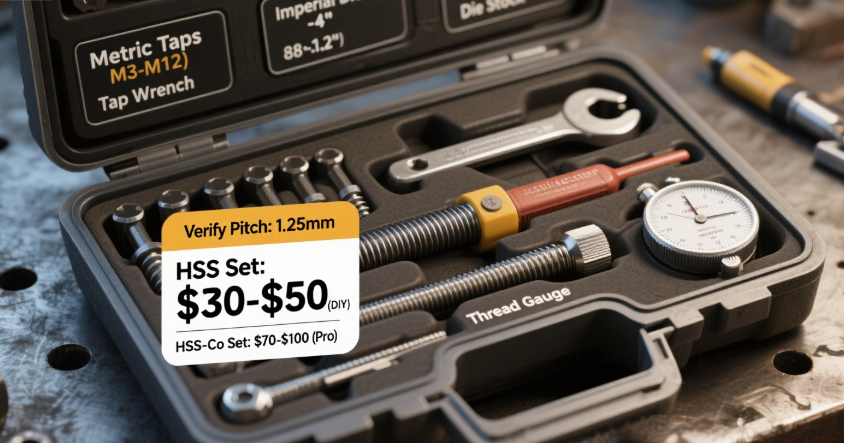
- Beginner/DIY users: HSS sets (affordable, easy to sharpen). A basic HSS set ($20-$40) will handle aluminum, mild steel, and wood.
- Intermediate/pro users: HSS-Co or TiN-coated sets ($50-$100). These last longer on stainless steel and alloy steel, making them worth the investment for frequent use.
- Industrial users: Carbide-tipped sets ($150+). Reserve these for hardened steel (HRC 45+) or high-volume production—they’re overkill for casual use.
3. Check Set Inclusions
A good set should have:
- 6-12 taps (taper, plug, bottoming for key sizes)
- 6-12 dies (round/solid for common sizes)
- A tap wrench (adjustable, fits ¼”-1” taps)
- A die stock (holds round dies securely)
- A thread gauge (to verify thread pitch—critical for repairs)
- A storage case (padded, labeled, and durable)
4. Avoid “Cheap” Sets
Sets under $15 are often made of low-quality steel (softer than HRC 55) that dulls after 1-2 uses. Look for brands like Irwin, Craftsman, or DEWALT—they offer warranties (1-5 years) and consistent quality.
Final Thoughts: Taps & Dies—The Foundation of Strong Threads
Every time you screw a bolt into a threaded hole or fasten a nut to a rod, you’re relying on the precision of taps and dies. These tools turn ordinary materials into functional connections—whether you’re repairing a lawnmower, building a bookshelf, or working on a car engine.
The key to success with taps and dies is simple:
- Choose the right tool (material, size, type) for the job.
- Follow the basics (correct pilot hole/rod diameter, lubrication, slow speed).
- Maintain your tools (clean, sharpen, store properly).
With these practices, you’ll avoid common frustrations (stripped threads, broken taps) and create connections that last. Whether you’re a beginner or a pro, a quality tap & die set is one of the most valuable additions to any toolbox.
Now grab your set, pick a scrap piece of metal, and start practicing—thread-cutting is a skill that only gets easier with time!