End Mills 101: The Essential Guide to Precision Milling for Metalworkers
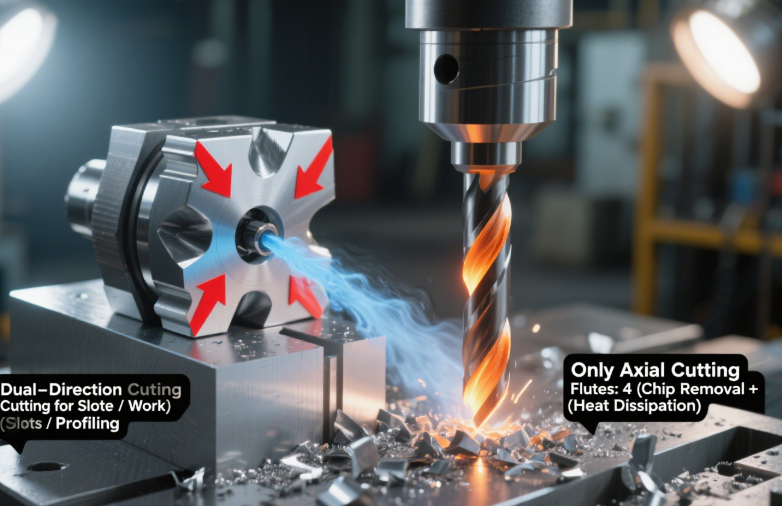
In the world of metalworking, few tools deliver the versatility and precision of end mills. Unlike drill bits (which only cut axially), end mills slice through materials in multiple directions—enabling everything from slotting and profiling to chamfering and 3D contouring. Whether you’re shaping aluminum brackets for a DIY project, machining stainless steel components for aerospace, or carving intricate patterns in brass, understanding end mills is key to achieving clean, accurate results.
This guide dives deep into the fundamentals of end mills: their types, materials, cutting mechanics, and how to choose/use them for optimal performance. We’ll also debunk common myths (e.g., “all end mills work for all metals”) and share pro tips to extend tool life—making it a must-read for both beginners and seasoned machinists.
What Are End Mills, and How Do They Differ from Drill Bits?
At first glance, end mills and drill bits may look similar—both have a cylindrical shape and cutting edges—but their design and functionality are worlds apart. Here’s the critical breakdown:
Core Design Differences
| Feature | End Mills | Drill Bits |
| Cutting Direction | Axial (downward) + radial (sideways) | Only axial (downward) |
| Cutting Edges | Multiple flutes (2–10+) on sides + tip | Single/multiple flutes (only on tip) |
| Primary Use | Slotting, profiling, contouring, chamfering | Drilling holes (no side cutting) |
| Tip Design | Square, ball-nose, corner-radius, or chamfered | Pointed (for centering) |
How End Mills Cut: The Flute Advantage
End mills rely on flutes (spiral channels) to remove material and dissipate heat. As the end mill rotates (typically 1,000–10,000 RPM), the flutes’ cutting edges shear through the material, while the channels carry away metal chips (swarf). This dual-directional cutting makes end mills indispensable for:
- Creating slots (e.g., a 5mm-wide slot in a steel plate).
- Profiling (shaping the outer edge of a component).
- Chamfering (adding a 45° angle to a part’s edge).
- Pocketing (hollowing out a recess in a material).
The 5 Most Common Types of End Mills (and When to Use Each)
End mills are categorized by their tip shape, flute count, and material—each designed for specific tasks. Below are the types you’ll encounter most often, with real-world use cases:
1. Square End Mills (Flat End Mills)
- Design: Flat, square tip with cutting edges on the sides and tip.
- Flute Count: 2–4 flutes (2 flutes for aluminum/soft metals; 4 flutes for steel/hard metals).
- Best For:
- Slotting (full-width slots in steel or aluminum).
- Facing (trimming the top surface of a part to make it flat).
- Machining straight edges or 90° corners.
- Example: Cutting a 10mm-wide slot in a 4140 alloy steel bracket for automotive use.
2. Ball-Nose End Mills
- Design: Rounded tip (like a ball) with cutting edges that curve from tip to flute.
- Flute Count: 2–4 flutes (4 flutes for smoother finishes).
- Best For:
- 3D contouring (e.g., machining curved surfaces on a motorcycle frame).
- Creating rounded edges or recesses.
- Engraving intricate patterns (e.g., logos on brass plaques).
- Pro Tip: Use a high spindle speed (5,000–8,000 RPM) for a polished finish—lower speeds leave tool marks.
3. Corner-Radius End Mills (Bull-Nose End Mills)
- Design: Square tip with a small rounded edge (radius) at the corner.
- Flute Count: 4–6 flutes (more flutes = better surface finish).
- Best For:
- Machining parts that need stress relief (rounded corners prevent cracking in high-torque applications).
- Cutting hard metals (stainless steel, titanium) where sharp corners would chip.
- Example: Machining a corner-radius slot in a titanium aerospace component to avoid fatigue cracks.
4. Chamfer End Mills
- Design: Angled tip (usually 45°, 30°, or 60°) with a single cutting edge.
- Flute Count: 1–2 flutes (simple design for quick chamfering).
- Best For:
- Adding bevels to part edges (prevents sharp, dangerous edges on finished products).
- Deburring holes (smoothing the rough edge around a drilled hole).
- Time-Saver: A 45° chamfer end mill can replace a file—cutting chamfers in seconds instead of minutes.
5. Roughing End Mills (Roughers)
- Design: Aggressive flute geometry (often with serrated edges) and a large chip capacity.
- Flute Count: 2–4 flutes (wide flutes for fast chip removal).
- Best For:
- Removing large amounts of material quickly (e.g., roughing down a 20mm steel block to 15mm).
- Preparing parts for finishing (leaving a small “finish allowance” for a square or ball-nose end mill).
- Advantage: Reduces machining time by 50% or more compared to finishing end mills.
End Mill Materials: Which One to Choose for Your Project?
An end mill’s performance depends heavily on its material—choosing the wrong one will lead to dulling, overheating, or even tool breakage. Here’s how the most common materials stack up:
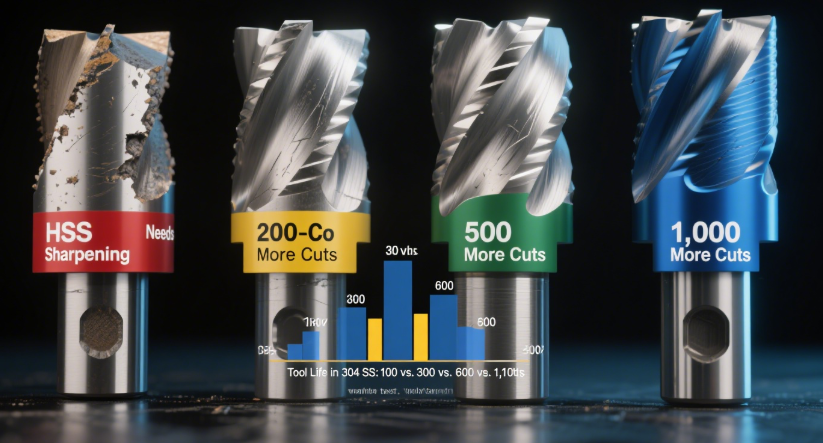
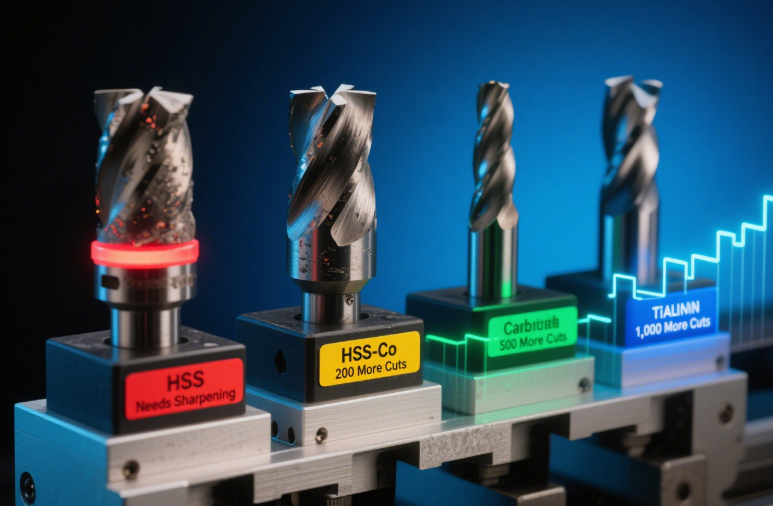
1. High-Speed Steel (HSS)
- Hardness (HRC): 62–64
- Max Operating Temp: 500°C (932°F)
- Best For: Soft metals (aluminum, brass, mild steel) and low-volume projects.
- Pros: Affordable, easy to sharpen, and less brittle than carbide.
- Cons: Dulls quickly on hard metals (stainless steel, titanium).
- Price Range: 10–30 per end mill.
2. Cobalt HSS (HSS-Co)
- Hardness (HRC): 65–67
- Max Operating Temp: 600°C (1112°F)
- Best For: Alloy steel, stainless steel (304/316), and cast iron.
- Pros: 2–3x longer life than standard HSS; handles higher speeds.
- Cons: More expensive than HSS; still not ideal for titanium.
- Price Range: 20–60 per end mill.
3. Carbide (Tungsten Carbide)
- Hardness (HRC): 85–90
- Max Operating Temp: 1,000°C (1,832°F)
- Best For: Hard metals (titanium, hardened steel, nickel alloys) and high-volume production.
- Pros: 5–10x longer life than HSS; maintains sharpness at high speeds.
- Cons: Brittle (can break if dropped); requires a rigid milling machine.
- Price Range: 50–200+ per end mill.
4. Coated Carbide
- Coatings: TiN (titanium nitride), TiAlN (titanium aluminum nitride), or ZrN (zirconium nitride).
- Best For: Extreme conditions (e.g., TiAlN-coated carbide for high-heat machining of stainless steel).
- Pros: Reduces friction, resists wear, and extends tool life by 30–50%.
- Example: A TiAlN-coated carbide end mill can machine 316 stainless steel at 3,000 RPM without overheating.
How to Use End Mills Correctly: Avoid Costly Mistakes
Even the best end mill will fail if used improperly. Follow these pro tips to achieve clean cuts and extend tool life:
1. Match Flute Count to Material
- Soft metals (aluminum, brass): 2 flutes (wide flutes = faster chip removal; prevents clogging).
- Hard metals (steel, stainless steel): 4–6 flutes (more edges = smoother cuts; reduces heat).
- Myth Buster: “More flutes = better” is false—2 flutes will outperform 4 flutes on aluminum (clogging ruins the cut).
2. Set the Right Speed & Feed Rate
Speed (RPM) and feed rate (mm per revolution) determine how efficiently the end mill cuts. Use this general guide for carbide end mills:
| Material | End Mill Diameter (mm) | RPM | Feed Rate (mm/rev) |
| Aluminum 6061 | 5 | 6,000 | 0.15 |
| Mild Steel (1018) | 5 | 3,000 | 0.10 |
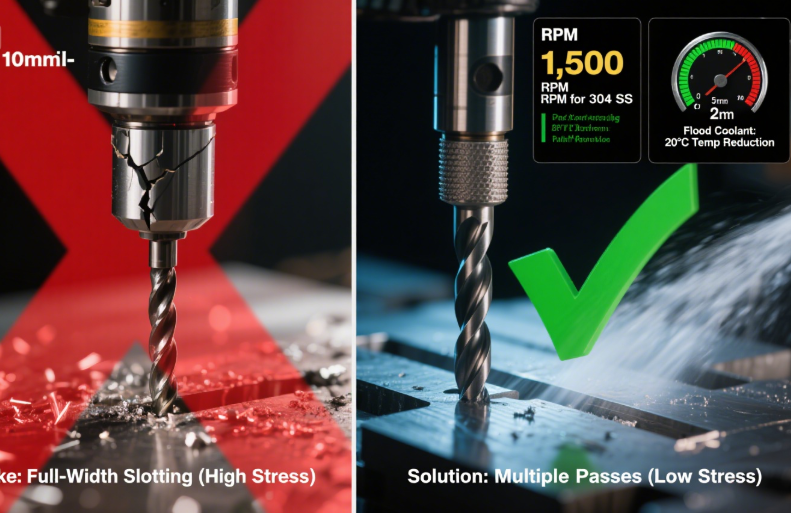
| Stainless Steel 304 | 5 | 1,500 | 0.05 |
| Titanium Grade 5 | 5 | 800 | 0.03 |
- Toolpath Tip: For slotting, use a “zig-zag” path instead of full-width cuts—this reduces tool load by 30%.
3. Use Coolant/Lubricant
- Flood coolant: Best for high-volume machining (cools the end mill and flushes chips).
- Mist coolant: Good for small shops (reduces coolant waste).
- Dry machining: Only for aluminum (use a 2-flute end mill to avoid clogging).
- Never dry-machine stainless steel or titanium—heat will shatter carbide end mills.
4. Avoid “Full-Width Slotting” (If Possible)
Cutting a slot as wide as the end mill’s diameter (full-width slotting) puts extreme stress on the tool. Instead:
- Use a smaller end mill and make multiple passes (e.g., cut a 10mm slot with a 5mm end mill in 2 passes).
- This reduces tool wear by 50% and improves cut quality.
End Mill Maintenance: Extend Tool Life by 70%
A quality end mill is an investment—with proper care, it can last for thousands of cuts. Here’s how to maintain it:
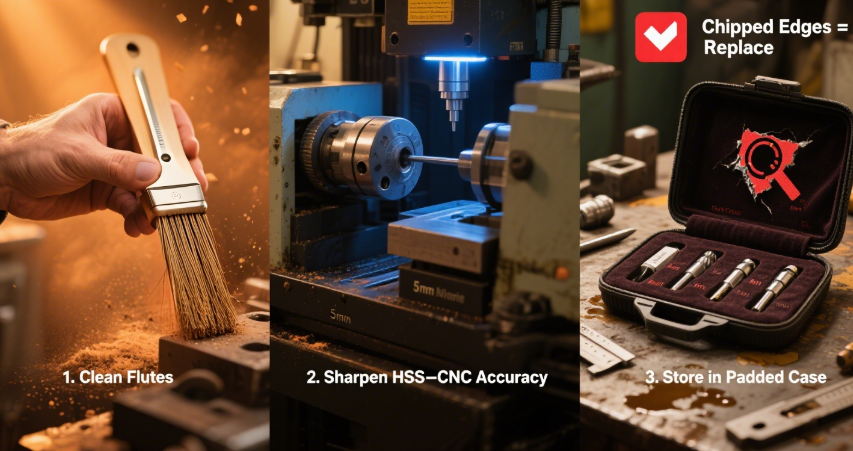
1. Clean After Every Use
- Wipe the end mill with a lint-free cloth to remove chips and coolant.
- For stuck chips in flutes, use a brass brush (steel brushes scratch carbide coatings).
- For TiAlN-coated end mills, avoid harsh solvents (e.g., acetone)—they damage the coating.
2. Sharpen When Dull
- HSS/HSS-Co end mills: Sharpen with a CNC sharpening machine (maintains the original flute angle). Hand sharpening is possible but risky (easy to ruin the cutting edge).
- Carbide end mills: Send to a professional sharpening service—carbide is too hard to file, and home sharpening often breaks the tool.
3. Store Properly
- Keep end mills in a padded end mill case (sorted by type/size) to avoid chipping.
- For carbide end mills, use a magnetic holder or foam inserts—never stack them (they’re brittle).
- Avoid storing end mills in humid areas (HSS can rust; carbide coatings degrade over time).
4. Inspect Before Use
- Check for chipped edges (hold the end mill up to light—chipped edges reflect unevenly).
- Look for coolant buildup in flutes (clogged flutes cause overheating).
- Replace end mills if the shank is bent (bent shanks lead to off-center cuts).
Final Thoughts: End Mills Are the Backbone of Precision Milling
Whether you’re a hobbyist with a benchtop mill or a professional machinist running a CNC center, end mills are the tools that turn raw metal into functional parts. The key to success is simple:
- Choose the right end mill type (square for slots, ball-nose for curves).
- Match the material to the task (carbide for titanium, HSS for aluminum).
- Use proper speed, feed, and coolant (avoid overheating).
- Maintain your tools (clean, sharpen, store carefully).
With these practices, you’ll not only get better results—you’ll also save money by reducing tool replacement costs. So the next time you fire up your milling machine, grab the right end mill, set it up correctly, and watch as it transforms metal into something precise and useful.
Happy milling!