Depth Gauges 101: The Ultimate Guide to Accurate Depth Measurement for Professionals & DIYers

In machining, woodworking, automotive repair, or even home DIY projects—precise depth measurement is non-negotiable. Whether you’re drilling a 5mm deep hole in a circuit board, checking the depth of a engine cylinder, or ensuring a wood countertop groove is 3mm deep, guesswork leads to wasted materials, failed parts, and rework. That’s where depth gauges (also called depth micrometers or depth rulers) come in: these specialized tools deliver measurements down to 0.01mm, turning vague “deep enough” into exact numbers.
This guide breaks down everything you need to master depth gauges: from understanding the different types (digital vs. mechanical) to nailing proper measurement technique, calibrating for accuracy, and fixing common mistakes. By the end, you’ll confidently use a depth gauge to get consistent, reliable depth readings every time.
What Is a Depth Gauge, and Why It’s Essential
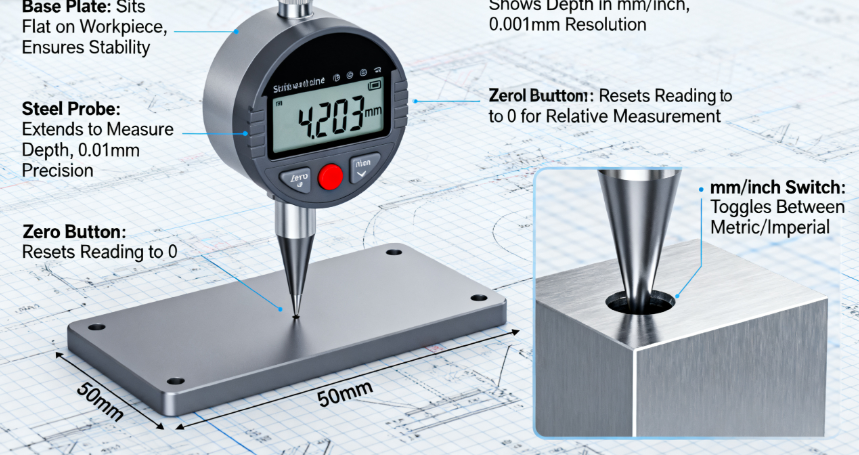
A depth gauge is a handheld measuring tool designed to measure the depth of holes, grooves, recesses, or steps in a workpiece. Unlike a regular ruler (which can’t reach into tight spaces or measure vertical depth accurately), depth gauges have a “base” that sits flat on the workpiece surface and a “probe” (or spindle) that extends downward into the area to be measured. The probe’s movement translates to a precise depth reading—critical for projects where even 0.1mm of error ruins the result.
Key Benefits of Using a Depth Gauge
- Accuracy: Mechanical depth gauges measure down to 0.01mm; digital versions go to 0.001mm—far more precise than a tape measure (0.1mm minimum) or ruler (1mm minimum).
- Versatility: Works on metal, wood, plastic, glass, and even soft materials like foam (with the right probe). Ideal for holes, slots, blind bores, and step features.
- Consistency: Eliminates human error from “eye-balling” depth—perfect for production lines where every part must match specs.
The 4 Main Types of Depth Gauges (Choose by Project & Precision)
Not all depth gauges are built the same—each type is optimized for specific tasks, materials, and accuracy needs. Here’s how to pick the right one:
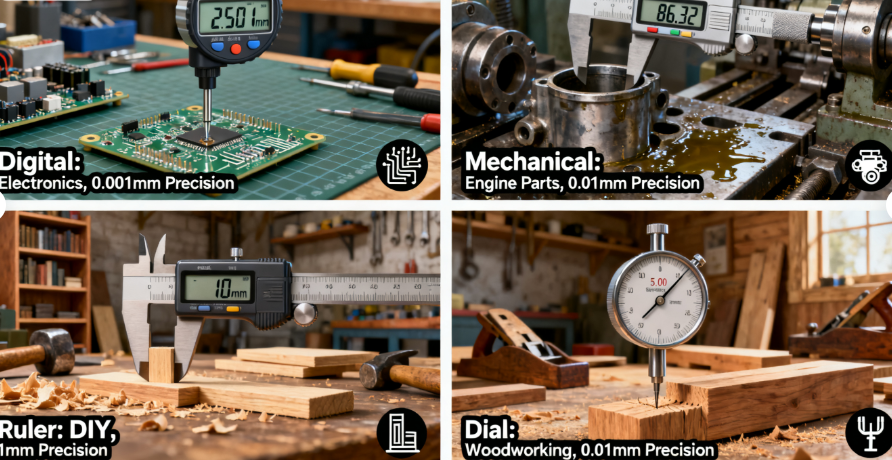
1. Digital Depth Gauges (The “User-Friendly” Choice)
- Design: Battery-powered (usually CR2032), with an LCD screen that displays depth in mm or inches. Probes are often retractable via a thumbwheel or button; some have a “hold” function to lock readings.
- Best For: Beginners, fast-paced projects (e.g., assembly lines), or tasks requiring quick readings (e.g., checking multiple holes in a circuit board).
- Top Materials/Tasks: Electronics (circuit board holes), woodworking (countertop grooves), automotive (spark plug well depth).
- Advantages: No need to read scales (reduces eye strain), one-button zeroing, and automatic unit conversion. Most have a tolerance alert (beeps if depth is outside set specs).
- Pro Tip: For soft materials like foam, use a plastic-tipped probe (instead of steel) to avoid damaging the workpiece—digital gauges with interchangeable probes are ideal.
2. Mechanical Depth Micrometers (The “Industrial-Grade” Option)
- Design: Manual, with a rotating thimble (like a micrometer) that adjusts the probe. Readings are taken from a main scale (mm/inch) and thimble scale (0.01mm increments). Made of hardened steel for durability.
- Best For: High-precision machining (e.g., engine cylinder depth), metalworking (blind bore measurement), or environments where batteries fail (e.g., dusty factories).
- Top Materials/Tasks: Steel (engine parts), aluminum (aerospace components), stainless steel (medical devices).
- Advantages: No batteries (always ready to use), more durable than digital gauges (resists drops and impacts), and consistent accuracy over decades with proper care.
- Watch Out For: Requires practice to read scales—mixing up main scale and thimble markings leads to errors. Test on a calibration block before use.
3. Depth Rulers (The “Budget-Friendly” Basic)
- Design: Simple, ruler-like tool with a sliding probe and a base. Readings are marked on a scale (1mm increments for basic models, 0.5mm for better ones). Made of plastic or lightweight steel.
- Best For: DIY projects (e.g., drilling shelf holes), home repair (e.g., measuring nail depth in drywall), or tasks where high precision isn’t needed.
- Top Materials/Tasks: Wood (shelf holes), plastic (toy assembly), drywall (anchor depth).
- Advantages: Cheap (under $10), lightweight (fits in a pocket), and easy to use—no training required.
- Limitations: Low accuracy (minimum 0.5mm error), not suitable for metalworking or tight spaces (probe is often too thick).
4. Dial Depth Gauges (The “Hybrid” Middle Ground)
- Design: Combines a mechanical probe with a dial indicator (analog display). The dial shows small increments (0.01mm), while a main scale shows larger ones (1mm). No batteries, but easier to read than a mechanical micrometer.
- Best For: Machinists who prefer analog readings, woodworking (mortise depth measurement), or quality control (checking batch consistency).
- Top Materials/Tasks: Wood (mortises), metal (step features), composite materials (boat hull components).
- Advantages: Balances accuracy (0.01mm) and ease of use (dial is faster to read than a thimble), no batteries, and durable enough for shop use.
How to Use a Depth Gauge Correctly (Step-by-Step Guide)
Even the most accurate depth gauge gives bad readings with poor technique. Follow these steps to measure depth perfectly—using a digital depth gauge to check a 3mm deep wood groove as an example:
Step 1: Prep the Gauge & Workpiece
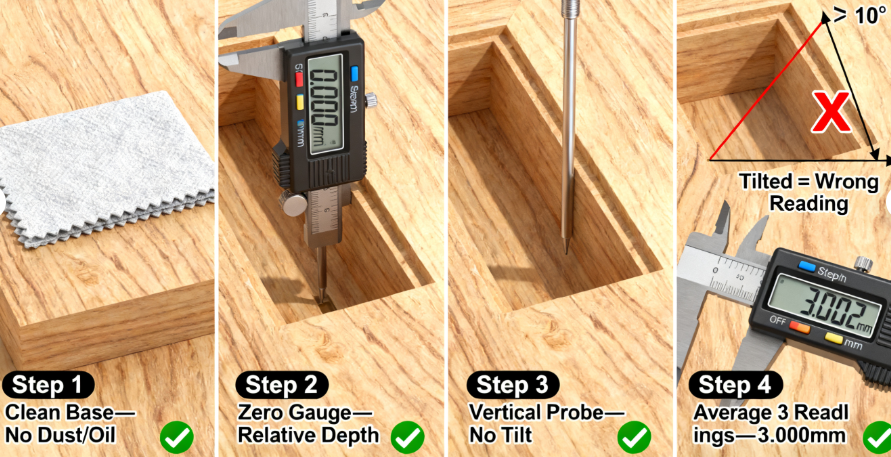
- Clean the Base Plate: Wipe the gauge’s base plate with a lint-free cloth—dust, oil, or wood shavings will lift the base, leading to shallow readings (e.g., a 0.1mm wood shaving makes a 3mm groove read 2.9mm).
- Smooth the Workpiece Surface: Ensure the area around the groove is flat—if the surface is rough (e.g., sanded wood), use fine-grit sandpaper (400 grit) to smooth it. A uneven surface tilts the base plate, causing errors.
- Zero the Gauge: Place the base plate on a flat calibration block (or the smooth workpiece surface, next to the groove). Press the “zero” button—this resets the display to “0.000mm”, so the gauge measures relative depth (only the groove, not the surface).
Step 2: Position the Gauge for Measurement
- Align the Probe: Hold the gauge vertically (use a level if needed) so the probe is directly above the groove. Tilting the gauge (even 5°) makes the probe extend further than the actual depth—e.g., a 3mm groove will read 3.01mm if tilted 10°.
- Lower the Probe Gently: Use the thumbwheel to lower the probe into the groove—stop when you feel slight resistance (don’t press hard!). Pressing too hard bends the probe or dents soft materials (e.g., wood), leading to deeper-than-actual readings.
Step 3: Take the Reading & Verify
- Lock the Probe (Optional): If your gauge has a “hold” button, press it to lock the reading—this is useful if you need to move the gauge to read the display (e.g., in a tight space).
- Record the Reading: Note the display (e.g., “3.002mm”)—this is the groove’s depth. For critical projects, take 3 readings (in different parts of the groove) and average them (e.g., 3.002mm, 2.998mm, 3.000mm → average 3.000mm) to reduce error.
- Check for Consistency: If readings vary by more than 0.01mm, clean the probe (wood shavings may be stuck) or re-zero the gauge—variation means the gauge isn’t calibrated or the workpiece is uneven.
Common Depth Gauge Mistakes (And How to Fix Them)
Even pros make these errors—here’s how to spot and solve them:
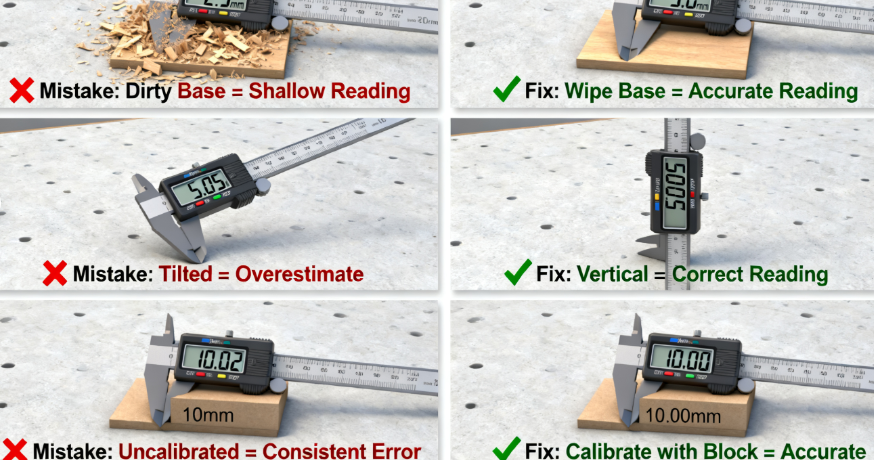
1. Dirty Base Plate or Probe (Causes Shallow/Deep Readings)
- Sign: A 3mm groove reads 2.9mm (dirty base) or 3.1mm (dirty probe).
- Fix: Wipe the base plate with isopropyl alcohol (cuts oil) and the probe with a brass brush (removes stuck debris, e.g., metal shavings). For wood, use a toothpick to clear the probe tip.
- Prevent: Keep a microfiber cloth in your tool bag—wipe the gauge before every use, especially in dusty shops.
2. Tilting the Gauge (Causes Overestimates)
- Sign: A straight 5mm hole reads 5.05mm—tilting the gauge makes the probe travel a longer path (like measuring the hypotenuse of a triangle).
- Fix: Use a digital gauge with a built-in level (some have a small bubble level) or hold the gauge against a vertical straightedge to keep it upright. For tight spaces, use a right-angle adapter to align the probe.
- Prevent: Practice holding the gauge vertically—use a mirror to check alignment until it becomes muscle memory.
3. Not Calibrating (Causes Consistent Errors)
- Sign: Every measurement is 0.02mm too deep—e.g., a 10mm calibration block reads 10.02mm.
- Fix: Calibrate the gauge with a certified calibration block (e.g., 5mm, 10mm, 20mm). For digital gauges: place the base on the block, lower the probe to the block’s surface, and use the “calibrate” button to adjust the display to the block’s size. For mechanical gauges: adjust the thimble until the scale matches the block’s depth.
- Prevent: Calibrate monthly (or after drops/heavy use)—most professionals use a calibration log to track when gauges were last checked.
Calibration & Maintenance: Keep Your Gauge Accurate for Years
A quality depth gauge (digital/mechanical) costs $50–$500—with proper care, it can last 10+ years. Follow these tips:
1. Calibrate Regularly
- Frequency: Monthly for shop use, quarterly for home use. After drops, heavy impacts, or exposure to extreme temperatures (e.g., leaving in a hot car), calibrate immediately.
- Tools Needed: Certified calibration blocks (set of 3–5 sizes, e.g., 2mm, 5mm, 10mm, 20mm) and a clean, flat surface (marble or granite slab works).
- How to Calibrate (Digital):
- Place the base on a 10mm calibration block.
- Lower the probe until it touches the block’s surface.
- Press “calibrate”—the display will adjust to “10.000mm”.
- Repeat with a 5mm block to confirm (should read “5.000mm”).
2. Clean After Every Use
- Mechanical Gauges: Wipe the thimble and probe with a dry cloth, then apply a drop of machine oil to the thimble threads (prevents rust). Avoid water—moisture causes steel parts to corrode.
- Digital Gauges: Wipe the LCD screen with a soft cloth (no alcohol—can damage the screen). Remove the battery if storing for more than 3 months (prevents leakage).
- Probes: For steel probes, use a wire brush to remove metal shavings; for plastic probes, wipe with soap and water (avoid harsh chemicals).
3. Store Properly
- Case: Keep the gauge in its original case (most come with a foam-lined case) to protect it from drops and dust.
- Temperature: Store in a room-temperature area (15–25°C)—extreme cold (below 0°C) makes plastic parts brittle; extreme heat (above 40°C) damages digital screens.
- Avoid Pressure: Don’t stack tools on top of the gauge—this bends the base plate or probe, ruining accuracy.
How to Choose the Right Depth Gauge for Your Project
With so many options, picking the right depth gauge can feel overwhelming—but it boils down to three key factors: precision needs, material type, and budget. Use this quick guide to decide:
| Project Type | Precision Needed | Best Gauge Type | Key Features to Look For |
|---|---|---|---|
| Circuit board drilling | 0.001mm | Digital | Plastic probe, tolerance alert, mm/inch switch |
| Engine cylinder measurement | 0.01mm | Mechanical Micrometer | Hardened steel body, 0–25mm range |
| DIY shelf holes | 1mm | Depth Ruler | Lightweight, pocket-sized, 0–100mm range |
| Wood mortise cutting | 0.01mm | Dial | Analog dial, easy-to-read scale, 0–50mm range |
For example: If you’re a hobbyist building a wooden bookshelf, a $10 depth ruler will suffice. If you’re a machinist working on engine parts, a $200 mechanical depth micrometer is worth the investment—it will last decades and avoid costly rework from inaccurate readings.
Conclusion
Depth gauges are the unsung heroes of precise work—they turn guesswork into certainty, whether you’re building a shelf or manufacturing medical devices. The key to mastering them is understanding which type fits your project, using proper technique (no tilting!), and keeping them calibrated and clean.
Remember: Even the most expensive gauge is useless if you skip prep steps (like cleaning the base plate) or ignore calibration. Take 2 minutes before each use to check the gauge—this small habit will save you hours of rework and wasted materials.
Now grab your gauge, calibrate it with a block, and start measuring—your next project will be sharper, more consistent, and free of “close enough” mistakes. Whether you’re a pro or a DIYer, accurate depth measurement is the first step to a job well done.