Calipers: The Ultimate Guide to Precision Measurement for DIYers & Pros

In the world of hardware and machining, precision isn’t just a nice-to-have—it’s make-or-break. Whether you’re fitting a piston in an engine, aligning a jewelry setting, or building a custom bookshelf, a 0.1mm error can turn a perfect project into a frustrating failure. That’s where calipers come in. These versatile measuring tools bridge the gap between rough rulers and high-tech laser scanners, delivering accurate readings for internal, external, and depth measurements with unmatched ease.
This guide dives into everything you need to know about calipers: from the difference between vernier and digital models to pro tips for avoiding measurement mistakes, plus how to maintain your tool for decades of reliable use. By the end, you’ll understand why calipers are the unsung heroes of every serious toolbox.
What Are Calipers, and Why Do You Need Them?
At its core, a caliper is a measuring instrument with two jaws (fixed and movable) and a scale, designed to measure distances with precision down to 0.01mm (or 0.0005 inches). Unlike rulers or tape measures— which struggle with small, tight spaces or curved surfaces—calipers excel at:
- External measurements: Diameters of rods, thickness of metal sheets, or width of bolts.
- Internal measurements: Inner diameters of pipes, holes in machinery, or gaps between parts.
- Depth measurements: How deep a slot or hole is (e.g., a recess for a screw head).
The Cost of Imprecision
Consider this: A mechanic using a ruler to measure a brake disc’s thickness might miss a 0.2mm wear difference—enough to cause brake vibration or failure. A jeweler relying on guesswork could ruin a $500 gemstone by cutting a setting 0.1mm too small. Calipers eliminate these risks by turning “close enough” into “exact.”
The 4 Main Types of Calipers (Which One Is Right for You?)
Calipers aren’t one-size-fits-all—each type is designed for specific tasks, skill levels, and budgets. Here’s how to choose:
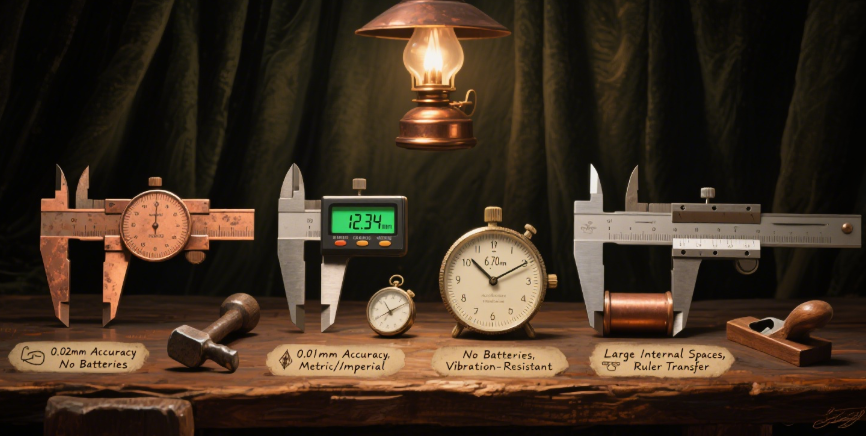
1. Vernier Calipers (Mechanical)
- Design: Features a main scale (like a ruler) and a smaller “vernier scale” that slides alongside it. To read, align the scales and calculate the difference.
- Accuracy: 0.02mm (metric) or 0.001 inches (imperial).
- Best For: Hobbyists, students, or anyone who wants to learn measurement fundamentals. No batteries needed—great for outdoor or remote work.
- Pro Tip: Look for stainless steel models (avoid plastic)—they resist bending and corrosion.
2. Digital Calipers (Electronic)
- Design: Uses an inductive sensor to display measurements on an LCD screen. Most switch between metric (mm/cm) and imperial (inches) with a button.
- Accuracy: 0.01mm or 0.0005 inches—more precise than vernier for most users.
- Best For: DIYers, mechanics, and professionals who need fast, error-free readings. Many have data output (USB) to log measurements (e.g., for quality control).
- Watch Out For: Cheap plastic digital calipers—they lack durability. Spend $30+ for a stainless steel body.
3. Dial Calipers (Mechanical-Electronic Hybrid)
- Design: Combines a mechanical jaw with a analog dial (instead of a vernier scale). The dial needle moves as you slide the jaw, showing readings at a glance.
- Accuracy: 0.01mm—same as digital, but no batteries.
- Best For: Machinists who prefer analog feedback (some find dials easier to read than LCDs in bright light) or work in environments with heavy vibration (digital screens can glitch).
4. Inside Calipers (Specialized)
- Design: No scale—instead, the two curved jaws expand to fit inside a hole, then you transfer the distance to a ruler or micrometer for measurement.
- Accuracy: Depends on your skill (typically 0.1mm).
- Best For: Measuring large internal spaces (e.g., pipe diameters over 50mm) where standard calipers are too small.
How to Use Calipers Correctly (Avoid Common Mistakes)
Even the best caliper will give bad readings if used wrong. Follow these steps for precision every time—using a digital caliper as an example (steps adapt easily to vernier/dial models):
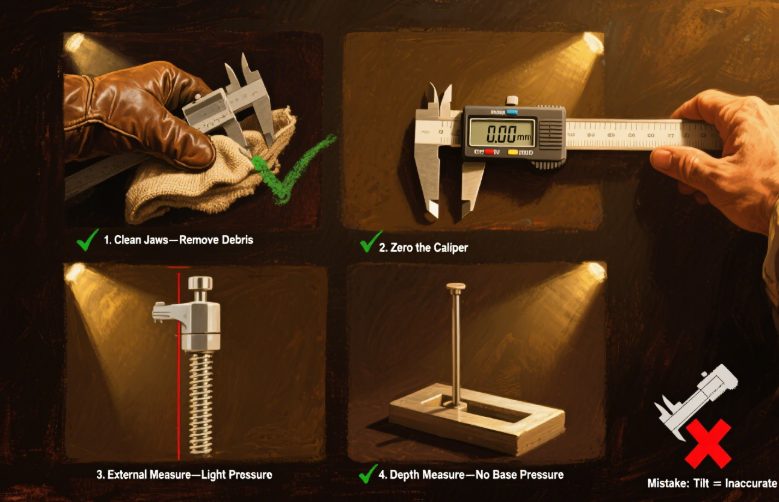
1. Prepare the Caliper
- Clean the jaws: Wipe them with a lint-free cloth to remove oil, dust, or metal shavings—debris can add 0.01–0.05mm to your reading.
- Zero the caliper: Close the jaws tightly (don’t force them!) and press the “zero” button. This resets the display to “0.00mm,” accounting for any minor jaw wear.
2. Take an External Measurement (e.g., Bolt Diameter)
- Open the jaws wider than the object, then gently close the movable jaw until it touches the object—apply light pressure (too much will bend the jaws or compress soft materials like plastic).
- Hold the caliper perpendicular to the object—tilting it even 5° can reduce accuracy by 0.1mm.
- Read the display: For a bolt, the screen might show “8.00mm” (if it’s an M8 bolt).
3. Take an Internal Measurement (e.g., Pipe Hole)
- Expand the jaws smaller than the hole, then slide the movable jaw outward until both jaws touch the hole’s inner walls.
- Keep the jaws parallel to the hole’s axis—this ensures you’re measuring the true diameter, not a smaller chord.
4. Take a Depth Measurement (e.g., Slot Depth)
- Extend the depth rod (the thin metal bar on the bottom of the caliper) beyond the slot’s depth.
- Place the caliper’s base flat on the object’s surface, then lower the depth rod until it touches the slot’s bottom.
- Avoid pressing down on the base—this can push the caliper into soft materials (e.g., wood) and skew the reading.
Common Mistakes to Avoid
- Forcing the jaws: This bends the caliper’s frame (permanently ruining accuracy) or damages the object.
- Ignoring zero drift: If the display shows “0.02mm” when jaws are closed, your readings will be off by 0.02mm—re-zero immediately.
- Measuring hot objects: Metal expands when heated—wait for the object to cool to room temperature (20–25°C) for accurate readings.
Calipers in Action: Industry Use Cases
Calipers are everywhere precision matters—here’s how professionals rely on them daily:
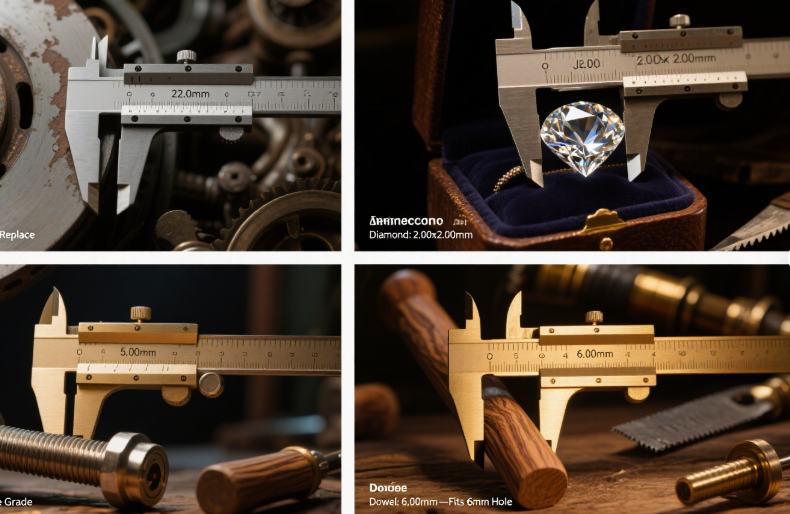
1. Automotive Repair
- What they measure: Brake disc thickness (to check for wear), piston diameter (to ensure a tight fit in cylinders), or spark plug gap (critical for engine performance).
- Example: A mechanic uses a digital caliper to measure a brake disc—if it’s 0.5mm thinner than the manufacturer’s minimum (e.g., 22mm vs. 22.5mm), the disc must be replaced to prevent overheating.
2. Jewelry Making
- What they measure: Gemstone dimensions (to fit settings), wire thickness (for chains), or ring band width (for sizing).
- Example: A jeweler uses a vernier caliper to measure a 2mm diamond—even a 0.05mm error would mean the stone doesn’t fit the custom setting.
3. Aerospace Manufacturing
- What they measure: Aircraft skin thickness (to ensure structural integrity), fastener diameter (for engine parts), or fuel line inner diameter (to control fuel flow).
- Example: An aerospace technician uses a dial caliper (vibration-resistant) to measure a titanium bolt—readings must be accurate to 0.01mm to meet safety standards.
4. Woodworking (Fine Furniture)
- What they measure: Thickness of veneer (for laminating), depth of dovetail joints (to ensure a tight fit), or diameter of wooden dowels (for assembly).
- Example: A woodworker uses a digital caliper to measure a 6mm dowel—if it’s 6.1mm, it won’t fit the pre-drilled 6mm hole.
Maintenance: Keep Your Caliper Accurate for 10+ Years
A quality caliper is an investment—with proper care, it will outlast most tools in your box. Follow these rules:
1. Clean After Every Use
- Wipe jaws and depth rod with a clean cloth to remove oil, dust, or metal chips. For stubborn debris (e.g., sawdust in woodworking), use a soft-bristle brush (never steel wool—it scratches the jaws).
- For stainless steel calipers: Apply a drop of light machine oil to the sliding parts every 3 months to prevent rust and keep the jaw movement smooth.
2. Store Properly
- Never leave calipers on a workbench—they can be knocked off and bent. Use a dedicated case (most calipers come with one) or hang them on a wall-mounted tool rack.
- Avoid extreme temperatures: Don’t store calipers near heaters or in freezing garages—temperature swings can warp the frame or damage digital components.
3. Calibrate Regularly
- DIY calibration: Use a gauge block (a precision metal block with a known size, e.g., 10.00mm). Close the caliper on the block—if the reading is 10.00mm, it’s accurate. If it’s 10.02mm, adjust the zero or take it to a professional.
- Professional calibration: For critical work (e.g., aerospace, medical), have your caliper calibrated by a certified lab every 1–2 years—this ensures it meets ISO standards.
4. Know When to Replace
Replace your caliper if:
- The jaws are bent or chipped (even a small chip causes inaccurate readings).
- The digital display glitches or won’t zero (battery replacement first—if that fails, it’s time for a new one).
- The vernier/dial scale is scratched or faded (you can’t read it properly).

How to Choose the Right Caliper (Buying Guide)
Not sure which caliper to buy? Use this checklist to narrow down your options:
1. Accuracy Needs
- DIY/woodworking: 0.02mm (vernier or budget digital) is enough.
- Automotive/jewelry: 0.01mm (mid-range digital or dial).
- Aerospace/medical: 0.001mm (high-end digital with calibration certificate).
2. Material
- Stainless steel: Best for durability—resists rust and bending. Avoid plastic (only good for light, non-critical use).
- Carbon fiber: Lightweight (great for portability) but more expensive—ideal for fieldwork (e.g., HVAC technicians).
3. Budget
- Entry-level ($20–$40): Plastic digital or basic stainless steel vernier—good for beginners.
- Mid-range ($50–$100): Stainless steel digital with data output—perfect for DIYers and part-time professionals.
- High-end ($150+): Dial or digital caliper with calibration certificate—for full-time machinists or aerospace workers.
4. Extras
- Data output: USB or Bluetooth to log measurements (useful for quality control).
- IP rating: IP54 or higher (water/dust resistant) if you work in messy environments (e.g., automotive repair).
- Backlit display: Easier to read in dark workshops.
Final Thoughts
Calipers aren’t just tools—they’re gatekeepers of precision. A good caliper turns guesswork into certainty, whether you’re fixing a car, making jewelry, or building a rocket. The key to getting the most out of yours is choosing the right type for your needs, using it correctly, and maintaining it properly.
Remember: Even the most expensive caliper is useless if you skip cleaning or calibration. Treat it with care, and it will reward you with accurate readings for years to come.
Now grab your caliper, zero it out, and start measuring—precision awaits!