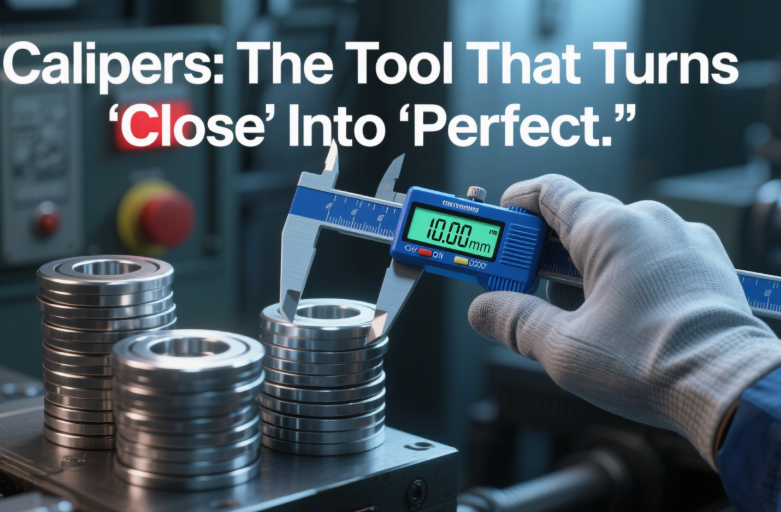
Calipers: The Precision Workhorse of Metalworking Measurement
In metalworking, where fractions of a millimeter define success or scrap, calipers stand as the most trusted measurement tool. Whether you’re machining a shaft to exact tolerances or verifying a drilled hole’s diameter, knowing how to choose, use, and maintain calipers transforms guesswork into precision. Let’s unpack everything you need to master this essential tool—from types and techniques to pro tips that save time and reduce errors.
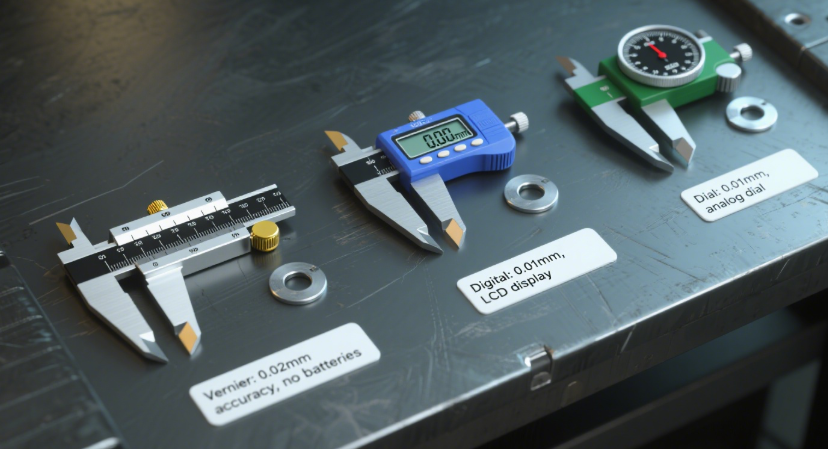
1. Types of Calipers: Which One Fits Your Job?
Not all calipers work for every task—each type has unique strengths. Here’s how to pick the right tool:
- Vernier Calipers: A classic mechanical option with a sliding scale (vernier scale) that measures to 0.02mm (0.001”) accuracy. Ideal for detailed work like measuring thread depth or thin-walled parts. No batteries mean it’s reliable in dusty or wet shops, but it requires practice to read.
- Digital Calipers: The modern favorite, with an LCD screen that displays measurements in mm, inches, or fractions—down to 0.01mm (0.0005”). Perfect for fast-paced jobs (like batch inspections) where speed and readability matter. Look for IP54/IP67 waterproof models for harsh environments.
- Dial Calipers: A middle ground—mechanical like vernier, but with a rotating dial that shows precise increments. Great for users who prefer analog feedback but want to avoid vernier scale math. Accuracy matches digital calipers (0.01mm) and they’re more durable than basic digitals.
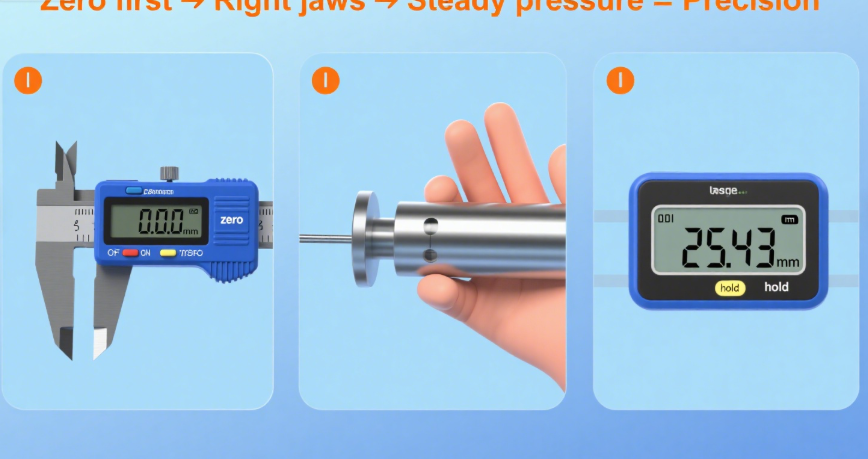
2. How to Measure with Calipers: Avoid Costly Mistakes
Even the best caliper fails if used incorrectly. Follow these steps for precise results:
- Zero Before Use: Close the jaws fully—for vernier/dial calipers, adjust the zero; for digital, press the “zero” button. This eliminates manufacturing tolerances or wear errors.
- Choose the Right Jaws: Use the external jaws (larger, flat jaws) for measuring outside dimensions (e.g., a shaft’s diameter). Use the internal jaws (smaller, curved jaws) for inside dimensions (e.g., a hole’s diameter). The depth rod (on the bottom) measures recesses or hole depth.
- Apply Steady, Even Pressure: Too much pressure bends the jaws (skewing results); too little means the jaws aren’t seated. Aim for a “firm but gentle” grip—digital calipers often have a “hold” function to lock measurements once set.
Data Tip: A 2023 shop study found that 70% of measurement errors came from skipping the zero step or using the wrong jaws. Taking 2 extra seconds to zero cut errors by 62%.
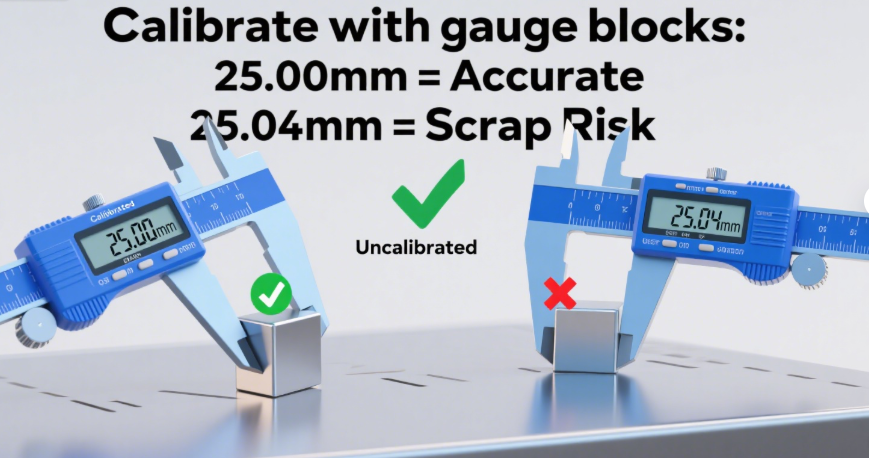
3. Calibration: Keep Your Calipers Accurate (Every 3–6 Months)
Calipers drift over time—dust, wear, and temperature changes throw off measurements. Calibrate regularly to avoid scrap:
- Use a Gauge Block Set: These are precision metal blocks with known dimensions (e.g., 10.00mm, 25.00mm, 50.00mm). Close the caliper jaws on a gauge block—if the reading matches the block’s size, it’s calibrated. If not, adjust (digital calipers often have a calibration screw; vernier may need professional service).
- Temperature Matters: Metal expands in heat—calibrate at room temperature (20–25°C/68–77°F). Measuring a hot part or using a caliper that’s been in direct sunlight can add 0.03mm of error per 10°C increase.
Pro Tip: For high-tolerance jobs (e.g., aerospace parts), calibrate monthly. For general use, every 6 months works.
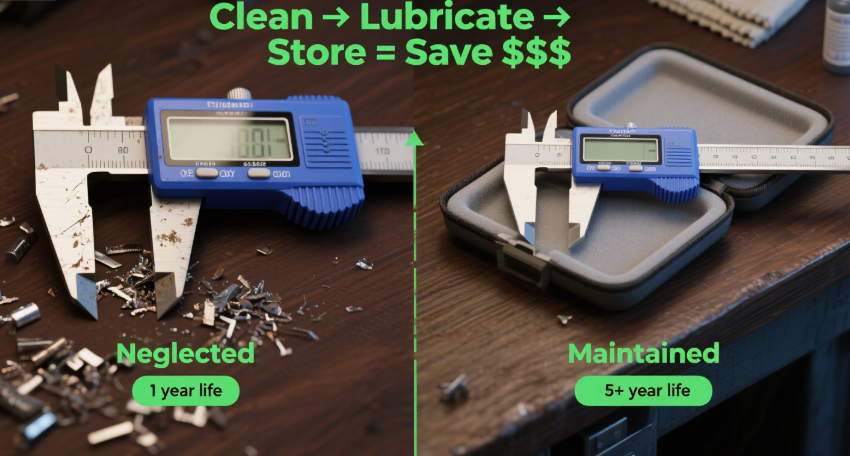
4. Maintenance: Extend Caliper Life to 5+ Years
A well-maintained caliper outlasts a neglected one by 3x. Follow these rules:
- Clean After Use: Wipe jaws and sliding surfaces with a lint-free cloth (avoid paper towels—they leave fibers). For tough grime, use a small amount of isopropyl alcohol, then dry immediately.
- Lubricate Sparingly: Every 2 months, apply 1 drop of light machine oil to the sliding rails (not the jaws—oil can attract dust). Move the slider back and forth to distribute the oil.
- Store Properly: Keep calipers in a padded case (not loose in a toolbox) to protect jaws from dings. Avoid dropping them—even a small impact can bend the frame and ruin accuracy.
Cost Insight: Replacing a mid-range digital caliper costs $40–$80. Maintenance costs less than $5/year and adds 3–4 years to its life—saving $120–$240 in replacements.
5. Common Mistakes to Avoid (And How to Fix Them)
Even pros slip up—here’s how to correct the most frequent errors:
- Reading the Wrong Unit: Digital calipers switch between mm and inches—double-check the LCD (look for “mm” or “in”). A 25mm part read as 25 inches is a catastrophic mistake!
- Measuring Curved Surfaces Wrong: For round parts (e.g., bolts), measure at 2 points 180° apart (diameter), not at an angle (which gives a smaller “chord” measurement).
- Ignoring Wear: If jaws don’t close fully (gap >0.01mm), or the slider sticks, stop using the caliper. A worn caliper can’t be trusted—get it serviced or replaced.
Final Thought: Calipers = Precision = Profit
In metalworking, precision isn’t a luxury—it’s how you avoid scrap, meet deadlines, and keep clients happy. A good caliper, used correctly and maintained well, pays for itself in weeks by cutting errors and saving time. Whether you’re a hobbyist with a $20 digital caliper or a pro with a $200 dial model, mastering this tool is the first step to sharper, more reliable work.