Essential Machining Tools: A Complete Guide for Pros & Hobbyists
In metalworking, woodworking, or manufacturing—having the right machining tools isn’t just about efficiency: it’s about turning raw materials into precise, high-quality parts. From drilling holes to measuring tiny tolerances, each tool serves a unique purpose, and using the wrong one can lead to wasted time, damaged workpieces, or even safety risks.
This guide breaks down the most essential machining tools every workshop needs, including drills, end mills, dial indicators, and cold saw blades. We’ll cover how each tool works, what materials it’s best for, common mistakes to avoid, and how to pair tools for maximum precision. By the end, you’ll build a tool kit that handles everything from basic repairs to advanced fabrication.
1. Drill Bits: The Foundation of Drilling
Drill bits are the first tool most people add to their workshop—and for good reason: they create holes in nearly any material, from wood to steel to concrete. But not all drill bits are the same—their design and material determine their performance.
Key Types & Uses
- Twist Drill Bits: The “all-purpose” bit—2 spiral flutes for chip evacuation. Ideal for wood, plastic, and mild steel. Choose 118° tips for soft materials and 135° “split points” for hard metals (prevents wandering).
- Masonry Bits: Carbide-tipped with wide flutes to clear dust. Use with a hammer drill for concrete, brick, or stone—hammer action breaks up abrasive materials.
- Forstner Bits: Creates flat-bottomed “blind holes” in wood (no conical bottom like twist bits). Perfect for hinge recesses or dowel holes.
Pro Tip for Longevity
Never drill metal without cutting oil—heat ruins drill bits. For HSS bits, sharpen with a drill bit sharpener every 50–100 holes; replace carbide-tipped bits when the tip chips (sharpening isn’t cost-effective).

2. End Mills: The Versatile Cutter for Shaping
Unlike drill bits (which only make holes), end mills cut in multiple directions—they’re essential for slotting, contouring, facing, and side milling. Whether you’re machining aluminum for a bike frame or steel for a gear, end mills turn flat stock into complex shapes.
Key Types & Uses
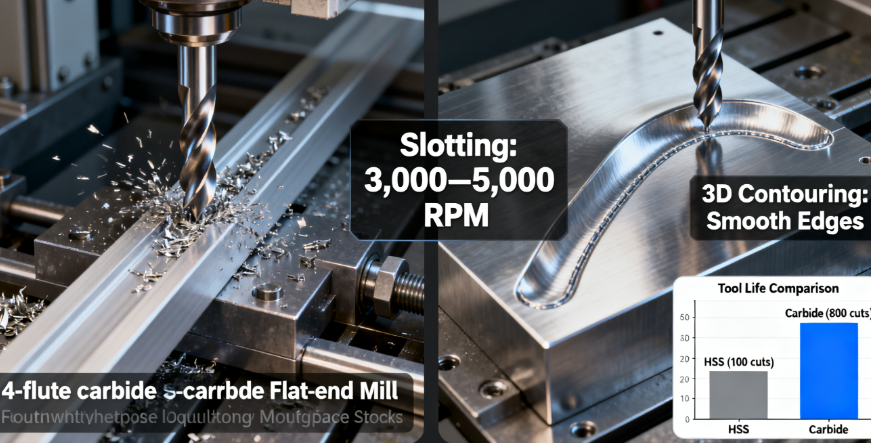
- Flat-End Mills: Square tips for straight slots and flat surfaces. 2-flute models excel in aluminum (fast chip flow); 4-flute models for steel (smoother finishes).
- Ball-Nose End Mills: Rounded tips for 3D contouring—ideal for curved surfaces like mold cavities or rounded edges on automotive parts.
- Roughing End Mills: Serrated flutes for removing large amounts of material quickly (e.g., “roughing out” a steel block before finishing).
Material Match
- HSS End Mills: For wood, plastic, and mild steel (budget-friendly, easy to sharpen).
- Carbide End Mills: For stainless steel, titanium, and high-volume jobs (5–10x longer life than HSS; TiAlN coatings add wear resistance).
3. Dial Indicators & Stands: Precision Measurement Partners
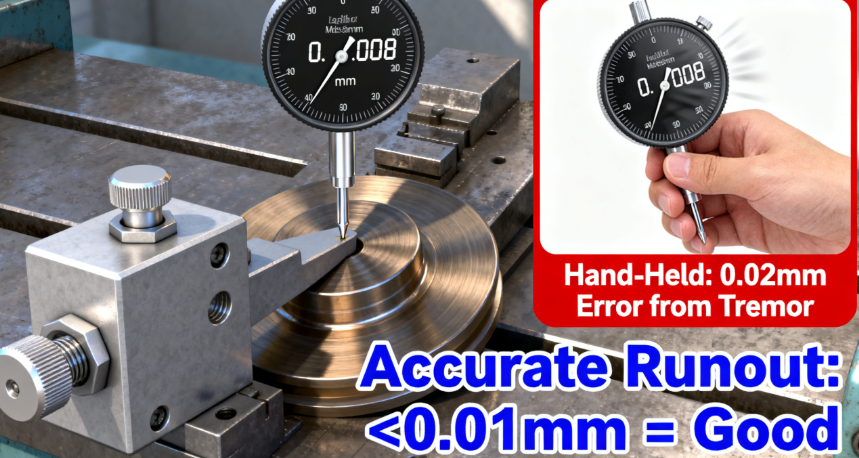
A dial indicator measures tiny movements (down to 0.01mm), but it’s useless without a stable stand. Together, they’re the go-to for aligning machines, checking runout, and verifying surface flatness—critical for jobs where “close enough” isn’t enough.
Key Pairings
- Lever Indicators + Magnetic Stands: Perfect for checking lathe chuck runout or brake rotor wobble. The magnetic base attaches to ferrous surfaces (e.g., lathe beds), and the lever stylus reaches tight spots.
- Plunger Indicators + Benchtop Stands: For measuring surface flatness (e.g., mill tables) or part thickness. The heavy steel stand prevents vibration, ensuring accurate readings.
How to Use Them
- Mount the stand on a stable surface (level it with a bubble level if included).
- Position the indicator stylus on the workpiece with light pressure (1–2 divisions of deflection).
- Zero the dial, then move the workpiece—any needle movement shows deviation (e.g., 0.008mm runout = good; 0.03mm = adjust).
4. Circular Cold Saw Blades: Cool, Clean Metal Cutting
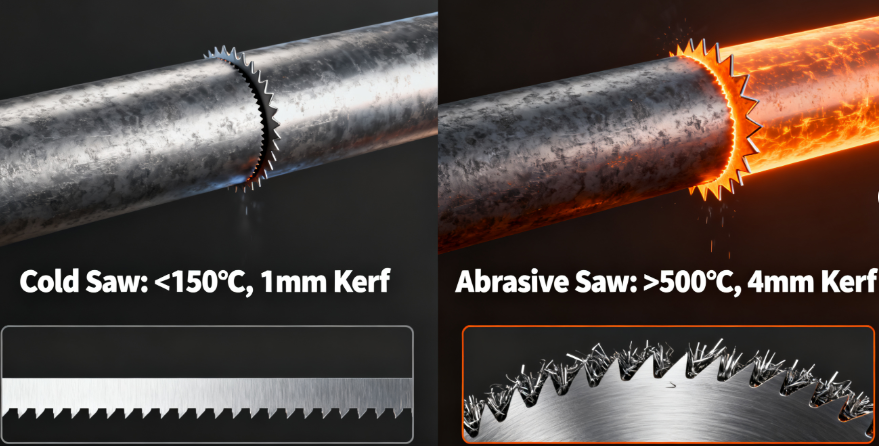
Cold saw blades cut metal at low temperatures (<150°C) using sharp, hardened teeth—no heat warping or jagged edges like abrasive saws. They’re essential for cutting steel, aluminum, and stainless steel with precision.
Key Features
- Tooth Count: Low (24–48) for thick metal (fast cuts); high (100–120) for thin metal (smooth finishes).
- Material: HSS for mild steel; carbide-tipped for stainless steel (10x longer life).
- Coolant: Always use coolant—water-soluble for steel, neat oil for aluminum (prevents overheating and tooth wear).
vs. Abrasive Saws
| Feature | Cold Saw Blades | Abrasive Saws |
|---|---|---|
| Temperature | <150°C (no warping) | >500°C (causes discoloration) |
| Surface Finish | Burr-free (no post-processing) | Rough (needs deburring) |
| Blade Life | 10,000+ cuts (carbide) | 500–1,000 cuts |
5. Digital Calipers: Accurate Measurements in Seconds
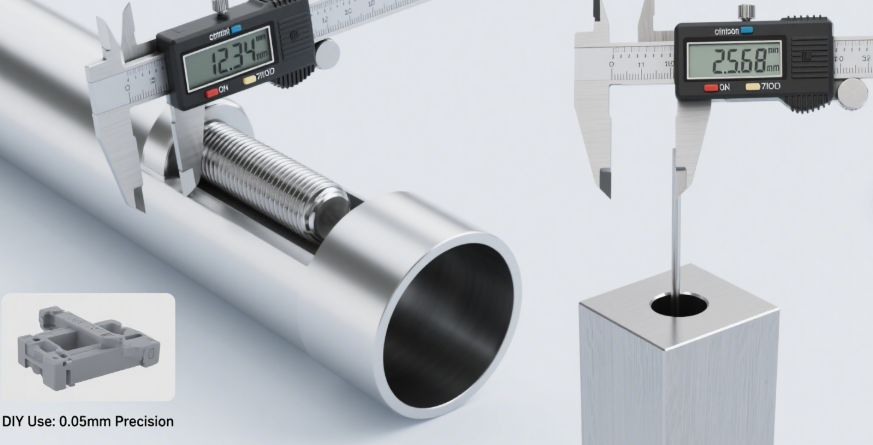
Digital calipers replace traditional vernier calipers with LCD screens that display measurements instantly (0.01mm precision). They measure external dimensions (e.g., bolt diameter), internal dimensions (e.g., pipe ID), depth, and steps—all with no squinting at tiny scales.
Key Types
- Stainless Steel: For professionals—durable, resists wear, ideal for metalworking.
- Plastic: For DIY/hobbyists—affordable, won’t scratch soft materials like wood or plastic.
- Carbon Fiber: Lightweight for fieldwork—IP54 water/dust resistance.
How to Avoid Mistakes
- Clean jaws before use (a tiny chip causes 0.05mm errors).
- Don’t measure hot workpieces (metal expands when heated).
- Zero the caliper after closing jaws—ensures accurate readings.
How to Build Your Workshop Tool Kit (Beginner to Pro)
Beginner Kit ($100–$300)
- Twist drill bit set (HSS, 1mm–10mm).
- Flat-end mill set (HSS, 2–4 flutes).
- Plastic digital caliper.
- Basic magnetic drill stand.
Intermediate Kit ($300–$800)
- Add: Carbide twist bits, ball-nose end mills, stainless steel digital caliper, lever indicator + magnetic stand.
Pro Kit ($800+)
- Add: Carbide cold saw blade, carbon fiber caliper (Bluetooth data output), precision benchtop stand, roughing end mills.
Final Thoughts
The best machining tools aren’t the most expensive—they’re the ones that match your projects. A beginner doesn’t need a $200 carbide end mill for woodworking, just like a pro can’t rely on a plastic caliper for steel parts. By understanding each tool’s purpose, material match, and proper use, you’ll save time, reduce waste, and create parts you’re proud of.
Remember: Maintenance matters too. Clean tools after use, store them in cases, and sharpen or replace dull parts—your tools will last for years, and your work will show the difference.
Now grab your tools, start small (e.g., drill a hole, measure a part), and build your skills—every pro started with the basics!