Dial Indicators: Fix Common Measurement Headaches & Boost Precision (Pro Tips Inside)
If you’ve ever spent hours machining a part, only to find it doesn’t fit because of a tiny alignment error—or struggled to diagnose why a machine vibrates nonstop—you know the frustration of imprecision. For machinists, mechanics, and serious DIYers, dial indicators aren’t just tools—they’re problem-solvers. These compact devices turn invisible, sub-millimeter movements into clear, actionable data, helping you fix alignment issues, detect wear before it causes failure, and ensure every part meets exact specs.
This guide goes beyond the basics: we’ll tackle the real-world problems dial indicators solve, share pro hacks for avoiding measurement mistakes, and break down how to pair indicators with the right mounts (a critical, often overlooked step). By the end, you’ll use your dial indicator to save time, reduce scrap, and build confidence in every project.
Why Dial Indicators Are Your Secret Weapon Against Imprecision
Most measurement tools (rulers, calipers) tell you how big something is—but dial indicators tell you how it moves. That’s why they’re irreplaceable for tasks where “close enough” leads to costly mistakes. Let’s look at three common headaches dial indicators fix:
Headache 1: “My Lathe Chuck Wobbles—And Ruins Parts”
A lathe chuck that’s “out of true” (runs with even 0.02mm of wobble) will turn a round rod into an oval mess. A lever dial indicator, mounted on a magnetic base, lets you measure this “runout” in seconds: touch the indicator’s stylus to the chuck, spin it, and the needle shows exactly how much it wobbles. Adjust the chuck jaws until runout is ≤0.01mm, and you’ll get perfect, round parts every time.
Headache 2: “I Can’t Tell If My Machine Table Is Level”
An unlevel milling machine table means cuts get deeper on one side—ruining expensive materials like aluminum or steel. A plunger dial indicator, dragged across the table’s surface, reveals even 0.005mm of unevenness. Level the table until the indicator’s reading stays consistent, and your cuts will be flat and precise.
Headache 3: “My Bearings Are Worn—but I Don’t Know When to Replace Them”
A worn bearing in a car engine or power tool causes noise and vibration—but waiting until it fails leads to bigger repairs. A dial indicator measures “endplay” (how much the bearing’s inner race moves axially): press the stylus against the rotating part, and excessive movement (e.g., >0.05mm for engine bearings) tells you it’s time to replace the bearing before it breaks.

Dial Indicator Basics: Types, Specs, and What They Mean for You
Not all dial indicators work for every job. To pick the right one, you need to understand two key things: type (plunger vs. lever) and specs (precision, range). Let’s break them down simply:
1. Plunger Dial Indicators: For Linear Movement
- How They Work: The stylus moves straight up/down (like a button being pressed) when it touches a surface.
- Best For: Measuring flatness (e.g., mill tables), thickness variations (e.g., checking if a metal sheet is even), or endplay (e.g., bearing wear).
- Key Specs:
- Precision: 0.01mm (metric) or 0.0005 inches (imperial) per division (enough for most shop tasks).
- Range: 5–25mm (how far the stylus can move—choose 10mm for most jobs).
2. Lever Dial Indicators: For Tight Spaces & Runout
- How They Work: The stylus is on a hinged lever, so it moves side-to-side (great for hard-to-reach spots).
- Best For: Checking runout (e.g., lathe chucks, brake rotors), aligning gears, or measuring gaps between parts.
- Key Specs:
- Precision: 0.001mm (metric) or 0.0001 inches (imperial)—more precise than plunger indicators.
- Range: 0.5–2mm (smaller range, but better for tiny movements).
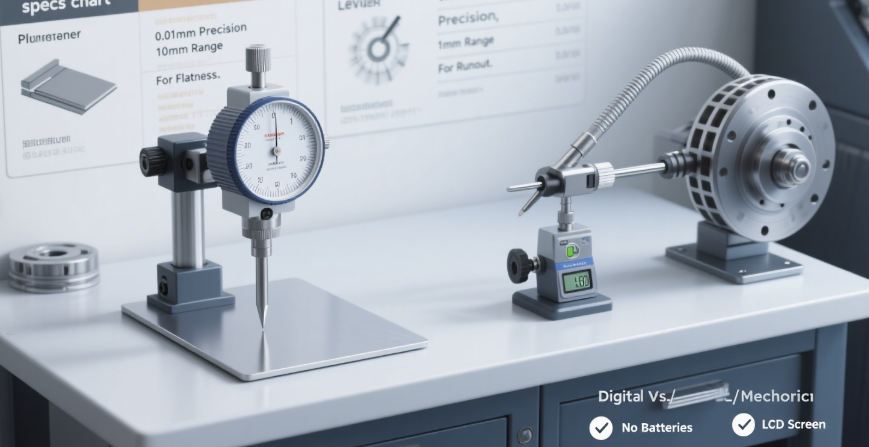
3. Digital vs. Mechanical: Which to Choose?
| Feature | Mechanical Dial Indicators | Digital Dial Indicators |
|---|---|---|
| Power Needed | None (no batteries) | Batteries (last 6–12 months) |
| Readability | Requires eye strain (small divisions) | LCD screen (no squinting—shows “0.005mm”) |
| Durability | Tough (no electronics to break) | Vulnerable to water/dust (look for IP65) |
| Data Logging | No (you write down readings) | Yes (USB/Bluetooth for QC reports) |
| Best For | Shop use (vibration, messy environments) | Precision work/QC (need to record data) |
The #1 Mistake People Make: Choosing the Wrong Mount
A dial indicator is only as good as its mount. Using a flimsy mount (or no mount at all) leads to wobbly readings—and wasted time. Here are the three most useful mounts, and when to use them:
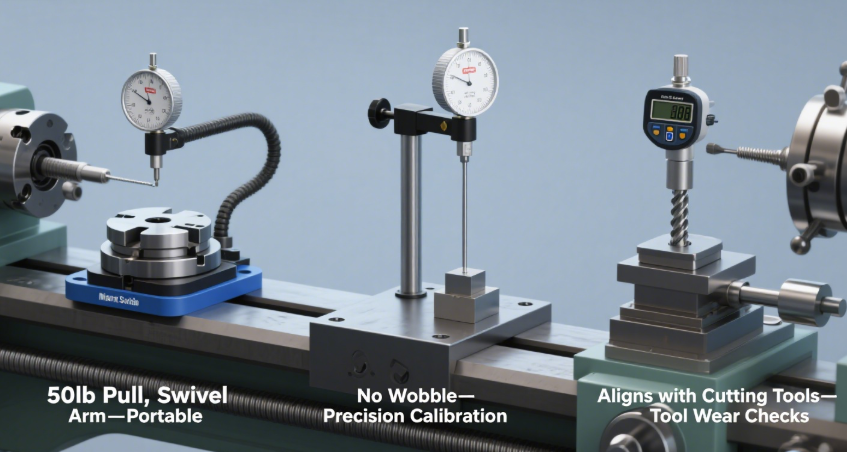
1. Magnetic Bases: Portable & Versatile
- How They Work: A strong magnet (50–100 lbs of pull) attaches to any ferrous (iron/steel) surface (e.g., lathe beds, machine frames).
- Best For: On-the-go measurements (e.g., checking a pump’s alignment at a job site) or mounting to machine tools with metal surfaces.
- Pro Tip: Get a “swivel magnetic base”—it lets you adjust the indicator’s angle without repositioning the base.
2. Benchtop Stands: Rock-Solid for Fixed Work
- How They Work: A heavy metal base (prevents wobble) with an adjustable arm that clamps to the bench.
- Best For: Precision work like calibrating gauge blocks or measuring small parts (e.g., checking a 3D printed component’s flatness).
- Avoid This: Cheap plastic stands—they flex, ruining readings. Spend $30+ for a steel stand.
3. Tool Post Mounts: For Lathes & Mills
- How They Work: Clamps directly to the lathe’s tool post or mill’s quill, keeping the indicator aligned with the cutting tool.
- Best For: Measuring tool wear (e.g., checking if an end mill is dull by comparing cutting depth to the indicator’s reading) or aligning workpieces with the tool.
Pro Tips for Accurate Readings (Avoid These 5 Mistakes)
Even pros make measurement mistakes—but these hacks will keep you on track:
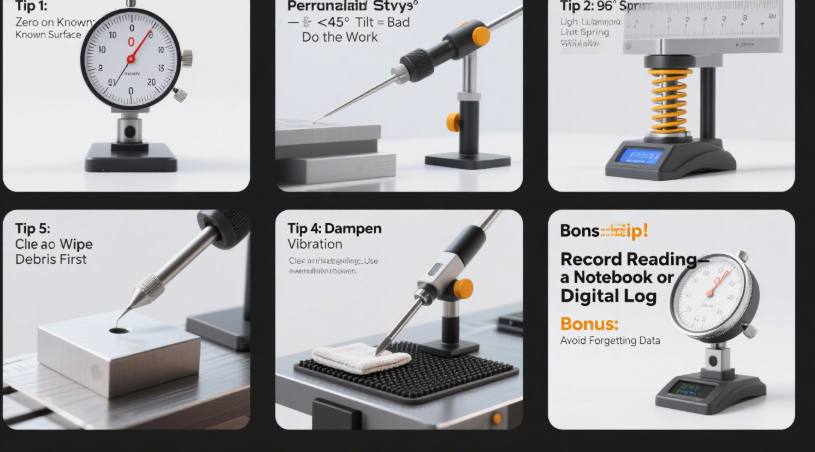
1. Always Set Zero on a “Known Good” Surface
Don’t zero the indicator on the workpiece itself (it might be uneven)! Instead, use a precision gauge block (a flat, calibrated metal block) or a machine’s reference surface (e.g., a lathe’s ways). This ensures your zero point is accurate.
2. Keep the Stylus Perpendicular (or Else…)
For lever indicators: If the stylus is tilted more than 45° to the workpiece, the reading will be wrong (the stylus slides instead of pushing the lever). Use a protractor app on your phone to check the angle, or adjust the mount until the lever is square to the surface.
3. Don’t Press Too Hard—Let the Spring Do the Work
Dial indicators have a tiny internal spring that keeps the stylus in contact with the workpiece. Pushing the stylus manually bends the spring, leading to false readings. Instead, adjust the mount so the stylus touches the surface with light pressure (the needle should move 1–2 divisions from zero).
4. Avoid Vibrations (They Lie!)
A vibrating workbench (from a nearby drill press or air compressor) makes the indicator’s needle jump. Turn off other tools while measuring, or place a rubber mat under the mount to dampen vibration.
5. Clean the Stylus—Debris Ruins Readings
A tiny metal chip or piece of sawdust on the stylus will cause inconsistent readings. Wipe the stylus with a lint-free cloth before every use—this takes 2 seconds and saves hours of frustration.
How to Maintain Your Dial Indicator (Make It Last 20+ Years)
A quality dial indicator (like Starrett, Mitutoyo, or Brown & Sharpe) costs $50–$200—with care, it will outlast most tools in your shop. Follow these three rules:
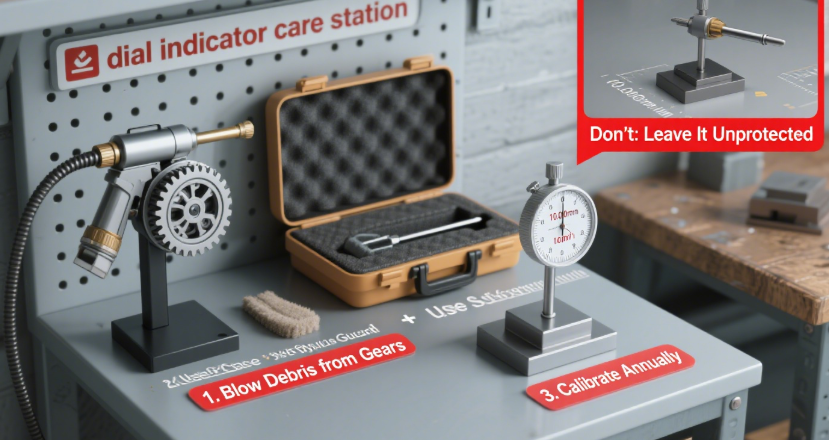
1. Clean It Every Time You Use It
- Wipe the stylus and dial face with a dry cloth to remove oil and dust.
- For mechanical indicators: Use a can of compressed air (low pressure!) to blow debris out of the internal gears (don’t use oil— it attracts dust).
- For digital indicators: Wipe the screen with a slightly damp cloth (avoid getting water in the buttons).
2. Store It Properly (No More Bent Styluses!)
- Always put the indicator back in its padded case—never leave it on the workbench (it will get knocked off and bent).
- For the stylus: Use the “stylus guard” (a small plastic cap that comes with most indicators) to protect the tip from damage.
- Avoid extreme temps: Don’t store indicators near heaters or in freezing garages—heat warps the dial, and cold ruins digital batteries.
3. Calibrate It Annually (Or When It Looks “Off”)
- DIY Calibration: Use a gauge block set (e.g., 5.000mm, 10.000mm). Press the indicator’s stylus against the block—if the reading matches the block’s size (±0.001mm), it’s accurate. If not, adjust the dial’s zero screw (check your indicator’s manual for how to do this).
- Professional Calibration: For work that requires ISO certification (e.g., aerospace parts), send the indicator to a lab every 1–2 years.
Final Thoughts: Your Dial Indicator Is an Investment—Use It Wisely
A dial indicator isn’t just another tool to collect—it’s a way to work smarter, not harder. By using it to fix alignment issues, detect wear early, and avoid scrap parts, you’ll save time and money every month.
Remember: The best dial indicator is the one you use regularly. Start with a mid-range mechanical lever indicator ($50–$80) and a magnetic base ($20–$30)—this combo handles 90% of shop tasks. As you gain experience, add a digital indicator for QC work or a dial test indicator for tight spaces.
Now grab your indicator, mount it properly, and start measuring—you’ll be amazed at how much better your projects turn out.